Digital Photo Workflow – Post Processing
Digital Photo Workflow:
Post Processing
Let’s review a very simple digital photo workflow to take you from camera to print. I’ll present an overview of organizing your files, keywording, editing, sharpening, printing, and more.
Post Processing Software
Note that I use Adobe Lightroom® for my basic raw editing, and Adobe Photoshop® for more complex manipulations. The majority of steps that I discuss here, however, apply in other software too, for example the Nikon or Canon camera RAW editors, or Apple Aperture®.
Digital Photo Workflow Topics:
- Beginning at the Beginning: in Camera
- Organizing Your Files
- Keywording, Cataloging and Rating
- Correcting Your Images
- RAW Conversion
- Specialized Editing
- Sharpening
- Printing
Beginning at the Beginning: in Camera
Our digital photography workflow begins in the camera. Let’s start by looking at some of the camera settings that affect the appearance of your final image.
Digital Photo Workflow: Settings
Tip
Digital Photo Workflow: Post-processingrefers to everything you do to your image after it is captured by your camera. I’m going to assume that if you’re interested in post-processing your images, then you are already capturing them in your camera’s RAW format. See the previous section if you’d like to review RAW vs JPEG.
White balance is the setting on your camera that compensates for the color of the light you are shooting in to create a final image that doesn’t have a color cast. For example, shooting under tungsten light gives a much more yellow color to the image than shooting in daylight. The white balance setting of your camera can adjust for that to render the final scene in a more natural color.
Note that if you are shooting in raw format, the white balance setting on your camera can be adjusted later, so you don’t really have to worry about it. For the record, I set my camera’s white balance to “auto,” since it does a fairly good job, and requires minimal adjustment later.
Other settings, like shutter speed, aperture and ISO, affect the quality (see the discussion on noise) and characteristics of the actual image captured, and cannot be changed later. You can make slight adjustments to your overall exposure in post-processing, as long as you haven’t clipped your histogram. In general, however, you need to get these settings right in the field, because you can’t “fix” them at a later stage of the digital photo workflow.
Digital Photo Workflow: Image Download
Once you’ve captured your image, you need to download it from your camera to your computer for post-processing. To speed up this stage of the digital photo workflow, you may want to consider buying a card reader to do that. Instead of plugging your camera into a USB port on your computer, you plug a card reading device into your computer, and insert your memory card directly into that. The advantage is that download times are much faster. If you shoot a lot and download often, a card reader will be well worth the investment.
Organizing Your Files
You’re ready to download your files to your computer, but where should you put them on your hard drive? First of all, know that there is no “right” or “wrong” way to do this, other than to say that the wrong way is to have no structure at all. You need to discover the system that works best for you.
File System Organization
© Julie Waterhouse Photography
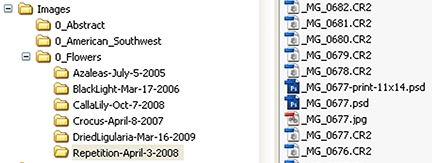
I maintain a directory structure that lets me navigate to different shoots easily. I have a single folder on my hard drive that I call “Images.” Within that, I have folders for different categories, representing subjects I shoot often, for example “Abstract,” “American Southwest,” and “Flowers.” Within each of those folders, I have a folder for each shoot. I use a naming convention that includes something descriptive about the shoot, plus the date. For example, within “Flowers,” I might have “Dahlias-June-4-2009.” All my images files are stored within that directory, including the raw files, as well as any PSDs (Photoshop files) and JPEGs. The latter grouping of all file types together is because I also manage my files through Adobe Photoshop Lightroom®, which saves derivative files in the same directory as the original. You may instead choose to have subdirectories for each file type, such as a folder named JPEG and a folder named PSD.
Keywording, Cataloging and Rating
A digital photo workflow is no good unless you can find your images. The best way to find your images is not through your computer’s filesystem, but through a rigorous keywording process. I happen to be a great fan of Adobe Photoshop Lightroom for its cataloging and keywording capabilities. Apple’s Aperture also provides strong keywording capabilities.
Tip
Google’s Picasa can also be used to store and organize your photos. It can adjust JPEG images, and includes the ability to add keywords etc. This is software intended for the hobbyist, rather than for the serious photographer.
Keywords are descriptive words that you associate with each image. They are stored in the metadata of the image. They may include names of objects in the picture like lake, canoe, fisherman, as well as words describing locations or time of year or day, like Algonquin Park, Autumn, morning, etc. You may even include words describing the mood of the image, like serenity. Extensive keywording is most important if you will be selling the images as stock. Otherwise, you simply want to use keywords that will help you find the image again later. For example, later on, you may want to pull up all images in your collection that contain a red canoe. If you have kept up with your keywording, you will be able to search your collection for the keywords “red” and “canoe.”
Some software provides additional tools for grouping and rating your images. You may be able to group images into collections that are related by certain criteria. Some collections may be created automatically by your software, like all 5-star rated images. Others may be user-defined, like all images that you’ve submitted to the Acme Stock Agency.
In the following digital photo workflow section, I describe the organizational workflow I use in Lightroom. If you are not interested in Lightroom, you can skip to the next section on correcting your images.
Digital Photo Workflow: Lightroom’s Workflow
The first thing I do after a shoot is to import my images directly from my card into Lightroom. I use Lightroom’s option to “Copy photos to a new location and add to catalog.” The new location I choose is a folder named according to the structure I explained in the previous section.
I also check the option for “Backup to…” and specify my backup hard drive. That way, I immediately have two copies of my raw images for safe-keeping. That’s an important step in the digital photo workflow.
At the time of import, I also add any generic keywords that apply to all the images on the shoot.
Tip
Given the ever-increasing size of our raw files, as cameras produce more and more megapixels, hard drives fill up fast. It’s really important to keep on top of deleting your rejected images so that your hard drive doesn’t get clogged up. Make it a habit to delete all rejected images right after you’ve gone through them. My experience is that if I wait, I never go back and do it later.
Once all my images are loaded into Lightroom, the next step in the digital photo workflow is to take a first pass through the images. I mark images that are clearly unusable (for example, out of focus) as “rejected.” I also use Lightroom’s rating system to flag my images.
Here, Lightroom provides a lot of options. You can mark images as “picks.” You can also give them a star rating from 1 to 5 stars. Finally, you can also give them a color rating using one of 5 colors. You can make use of any or all of these rating systems in a way that makes sense to you. The key is to be consistent. Picks may be the ones you’ll show to the client. Perhaps you want to mark images that are suitable for a montage with the color red, and images submitted to stock with blue. Your star rating may indicate your impression of the image quality, with 5-stars being your super-amazing images.
Lightroom allows you to create smart collections based on color or star ratings, so it’s very easy later to look at all your top images, or all your stock submissions, as a group.
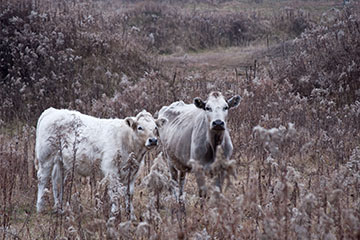
As you go through your images, take the time to add specific keywords for all your picks. This will pay dividends later when you’re looking for a particular image, and you can use your software to search for “red dahlia” or “Ontario Jersey cow.”
BetterPhoto.com offers many great courses. I’ve taken three of them myself, and highly recommend the company. They have a 4-week course on Lightroom so you can learn more about how to use all the features of this software:
Correcting Your Images
Note: Before you make any kind of color or tonal corrections to your images, you must make sure that you calibrate your monitor. This step is absolutely crucial, or else you will be wasting your time on the steps that follow.
Now that you’ve chosen your favorite images through whatever software you’re using, the next step of the digital photo workflow is to do a little post-processing. A raw file is like a digital negative, and just like traditional print photographers had work to do in the darkroom, so do photographers who are shooting in raw format.
I make my corrections in Lightroom. You can use any raw converter. The major camera manufacturers each provide one with their DSLRs, and there are other choices like Photoshop or Aperture. All of them have all the controls you need to adjust white balance, exposure, contrast, etc.
Tip
Digital Photo Workflow:
Using the Develop module in Lightroom, I adjust my settings pretty much in the order that Lightroom presents them to me, since they have worked out a logical workflow. It leads you to make the most significant corrections first (such as white balance and exposure), and come to the finer adjustments afterwards.
The first thing to adjust is your white balance. When I use my camera’s “auto” setting, it does a pretty good job, and I don’t always have to do much here. Sometimes, I want to warm up, or cool down, the image to create a certain mood. Other times, if I’ve been shooting in artificial light, I may want to remove the yellow cast created by tungsten light, for example.
Next I correct my exposure. Where I can, I often overexpose my image in the field (without “going over” and blowing out the whites). I then reduce the exposure in post-processing. I do this because the camera records more data in the brighter stops than in the darker ones — that’s just how it works. So if I underexpose when I shoot, I’m actually throwing away data.
Tip
Digital Photo Workflow:
In Lightroom, I make frequent use of the “clarity” slider to add contrast to the mid-tones of the image. I’ve heard this referred to as the “make better” slider!
After an overall exposure correction, I check the blacks and whites, and adjust them so that my histogram is not clipped, and I have a wide tonal range in the image. I will make limited use of fill light, since I find that it flattens my images if I use too much.
If I’m still not happy with the contrast and tonal range in the image, I’ll use the Curves tool to make further adjustments.
Digital Photo Workflow: Black and White
Images whose primary interest lies in their tonal contrast and form lend themselves well to being rendered in black and white. Today’s software can create stunning black and white images, and the available tools give you great flexibility and precision over converting colors to tones.
Lightroom’s Grayscale Mixer is great for converting your images to black and white. Photoshop also has a “Black and White” adjustment layer that does a terrific job (an improvement over the older Channel Mixer).
Tip
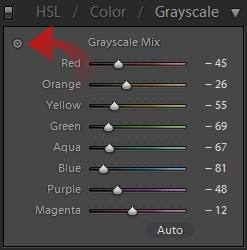 Lightroom: You may want to make a virtual copy of your image first. Then, click on “Grayscale” for the initial conversion, but don’t stop there. That removes color from the image, but it will likely not yield the optimal black and white image right off the bat. You’ll want to adjust the grayscale mix sliders. You can do this easily by actually selecting the dragging tool (see the image at the left), and dragging your mouse on areas of the image.
In whichever software you are using to convert, areas that used to contain red in the color version of the image will respond to adjustments of the red slider; areas that used to contain orange will respond to adjustments of the orange slider, and so on. You need to decide where you want the darkest and lightest areas of your images, and then use the sliders to lighten or darken those particular colors.
It’s tempting to use these sliders to affect image contrast. Resist that! there are better tools to adjust contrast. Instead, what you should be doing is mapping colors to tones. For example, you can lighten all the reds in the image and darken all the greens.
You will find that skin tones tend to respond to the orange slider and nature images often respond to the green slider. Experiment to see the effects of each slider for your particular image.
Digital Photo Workflow: Dust Spot Removal
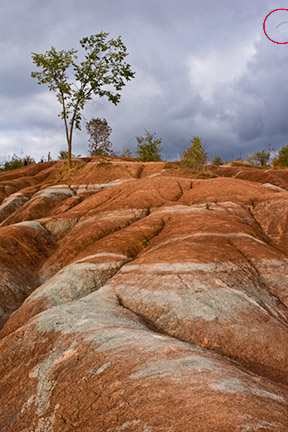
Let’s move to the next phase of the digital photo workflow. Once you have adjusted the overall color and tone of the image, it’s time to start looking at the details. One of the biggest problems with DSLR cameras is sensor dust. When we are changing lenses, there’s an opportunity for dust to get in and settle on the sensor. It shows up as little gray spot on your image. It’s always a good idea to check your images for sensor dust by zooming in to full magnification. In the image below, you don’t need to zoom in to see the long thread of dust that has appeared in the top right of the image.
Digital Photo Workflow: Sensor Dust
© Julie Waterhouse Photography
Lightroom, Photoshop and Aperture all provide clone tools that can be used to remove the offending dust spot.
Cloning in Lightroom
In Lightroom, select the clone tool, and then move the circle over the area you want to replace in the image. You can resize the tool’s bounding circle with the [ and ] keys. Lightroom will automatically seek out a nearby, similar area in the image, and highlight it with a second circle. The contents of your first circle, will be replaced with the new target circle’s contents, and blended to smooth the edges. If you don’t like Lightroom’s choice of target circle, then you can grab it with the mouse and move it around in real time to find an area that blends better with the original image.
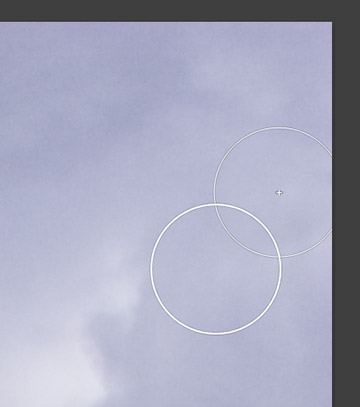
Lightroom’s clone tool used to heal the dust spot
from the previous image.
© Julie Waterhouse Photography
Like magic, the dust is gone!
RAW Conversion
For this phase of the digital photo workflow, I assume that you are shooting your images in camera raw format, as opposed to JPEG. Refer to the discussion in the last section on RAW vs JPEG to understand the advantages and disadvantages of each format.
In order to print your images or post them to the web, you need to convert them from raw format to another format that can be interpreted by the software programs that print or display the images. Which format should you select?
Let’s look at three common image file formats: JPEG, PSD, and TIFF. The format you choose will depend on what you want to use the image for.
Digital Photo Workflow: JPEG
JPEG is named after the Joint Photographic Experts Group which created the standard. JPEG images are compressed, which means that their file sizes are typically smaller than other file formats. This makes JPEG a useful format to choose if you are emailing your images, or posting them on the Internet.
The amount of compression used in a JPEG can be adjusted, which allows you to balance the tradeoff between file size and image quality. If a high degree of compression is chosen, artifacts may appear in the image. These are commonly referred to as “jaggies,” and appear as jagged edges which are particularly noticeable around sharp corners between contrasting colors.
JPEG compression always results in a loss of information. This means that every time (well, almost every time — there are some exceptions with certain kinds of edits like rotating an image) you save a JPEG file, you lose data. This is why, if you are post-processing your images, you should be starting with a raw file, and not a JEPG.
Digital Photo Workflow: PSD
PSD (Photoshop Document) is Photoshop’s proprietary file format. It contains information about layers, layer masks, clipping paths, color spaces and more. It is understood by many Adobe programs, such as Illustrator, so that files can be easily transferred between software. It is such a popular format that many competitor’s products support the PSD format to some degree.
PSD files are obviously useful if you are working with Adobe Photoshop to manipulate your images, since you can preserve all your layer information. Note that these files can become very large, however, especially when they include multiple layers (each layer adds to the file size).
Digital Photo Workflow: TIFF
TIFF (Tagged Image File Format) is another file format for storing images. Unlike JPEG, the compression it uses is lossless. This means that TIFFs can be re-saved without losing image information. TIFF is a widely used standard (although it too is currently under the control of Adobe Systems) that is understood by a broad range of photographic software on the market. It is a useful format in which to store your images if you need them to be portable outside of Adobe software, but don’t want to lose any image quality.
Digital Photography Basics
© Julie Waterhouse Photography
Digital Photo Workflow: How to Convert your Images
At this stage of the digital photo workflow, you must use raw conversion software to convert your raw image to a JPEG, PSD or TIFF. When you buy your DSLR camera, it will typically come with raw conversion software that you can use to make you image adjustments, and then save the resulting image in another format. Also, Lightroom, Photoshop and Aperture have built in raw converters. After editing your raw images in this software, you can save them as JPEG or TIFF, or in the case of Photoshop, as a PSD.
Note that if you have a newer camera, you may need to upgrade your raw conversion software so that you have the latest plugin that supports your particular camera.
Specialized Editing
Specialized editing is an optional stage of the digital photo workflow. If you want to do any “fancy” photo editing that goes beyond cropping, dust removal and color and tonal adjustments, you need to venture beyond a simple camera raw editor and into a specialized software program.
The biggest name out there for serious photographer is Adobe’s Photoshop and Photoshop Elements. However, don’t overlook the lesser known, but excellent software from onOne Software. Their software runs standalone, or as a plugin to Photoshop, Lightroom, and Aperture. I’ve been using some of their plugins for years, and find them excellent. You can get 10% off any purchase using our discount code UPT10. Check them out: http://www.ononesoftware.com
There are other programs out there too, for the serious hobbyist, such as Corel Paint Shop Pro Photo, Serif PhotoPlus and GIMP (the free GNU Image Manipulation Program).
In this kind of software, you can make more advanced edits, such as applying filters and effects, making localized changes, sophisticated cloning, and blending of images. For example, the image below was created by blending two images: a winter landscape, and a close-up of a slice of agate rock. With a rich-featured photo editing software, you are only limited by your imagination.
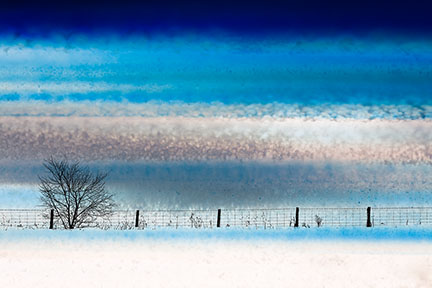
Specialized Photo Editing
© Julie Waterhouse Photography
Sharpening
Digital Photo Workflow: What is sharpening?
Tip
Don’t overdo your sharpening, or else you will see an unattractive and distinctive halo effect around your edges.
Sharpening is a process that’s used to enhance the appearance of sharp edges in your image. It is accomplished through local contrast adjustments, i.e., increasing the contrast along edges to make them appear sharper.
Visit the in-depth page on photo sharpening to learn more about methods of sharpening, and when and why to apply them.
Printing
The final stage of the digital photo workflow is printing. I personally believe that the photographic process is not complete until a print has been made. In this digital age, our images often reside on computers, even phones, and are never made into prints. For me, though, there’s nothing more satisfying than holding that final print on my favorite paper.
Printing is a huge topic, with as much to learn as the photographic process itself. I’ve put together an overview of a few important topics to at least let you know what you need to learn!
Digital Photo Workflow: Color spaces and calibration
The first key issue to address regarding printing is whether you are working in a color-managed environment. The tricky part about printing is making what’s on your monitor match what comes out on your printer. The color and brightness characteristics of a monitor are very different than those of a printer. That means that some kind of mapping must take place between the two.
Most quality printers come well-calibrated out of the box. What you must do is calibrate your monitor so that you know you are displaying the right colors and tones. The most reliable way to do this is using a hardware device that is placed on the monitor for measuring colors and brightness, such as the Spyder from Colorvision.
Digital Photo Workflow: Resolution
For the best quality in printing, you will want your image to have a resolution of at least 240ppi (pixels per inch). 300ppi is often preferred for better quality. Learn more about resolution.
Pixels per inch (ppi) refers to the quantity of pixels in the digital image. Once we print the image, we are also concerned about dpi, or dots per inch. Although people sometimes confuse the ideas, dpi is completely separate from ppi. Dots per inch refers to the amount of ink that the printer lays down on the paper over a linear inch. Ink is put on the paper as tiny dots of color. The more dots per inch, then the clearer and more detailed the output (to a point). Printers are usually capable of operating at a couple of different dpi settings (for proof mode or final, for example), and the option is set through the printer driver. The dpi of the printer usually needs to be much higher than the ppi of your monitor in order to produce a similar quality of output. I have a choice of three quality levels on my Epson 4000 printer: 360dpi, 720dpi or 1440dpi.
Digital Photo Workflow: Software
You can print photos from your image editing programs like Lightroom, Photoshop or Aperture. Here, you can deal with image layout, margins, paper size, rotation, etc. In addition, you will select a profile to use for printing, which we will discuss the upcoming section on “ICC Profiles.” Although you are printing from a software program, the actual control over the print comes from the underlying printer driver software that comes with your printer. So, if you are printing on an Epson printer, you’ll have a different interface than if you are printing on an HP or Canon printer.
© Julie Waterhouse Photography
Digital Photo Workflow: Paper and Ink
Tip
Glossy papers tend to render more saturated colors, and darker blacks, than do matte papers.
The paper you use has a huge impact on the look of the final image. Papers differ in surface texture and in brightness. Papers can be matte, luster, or glossy, and matte papers can be varying degrees of smooth, or rough. The roughness may be regular or irregular. Papers can vary in brightness from snow white (usually containing optical brighteners) to cream. An image can appear drastically different on each kind of paper. It’s worth testing a few before making a selection for regular use.
It can be a good idea to settle on only a few different papers for your prints, perhaps choosing one for your color images and another for your black and white. This way you can become familiar with their characteristics, and know how to manipulate your digital image to get the best results from a print.
There are many fine papers out there made by companies such as Epson, Red River Paper and Hahnemühle. My current favorites are Hahnemühle Bamboo for my black and white prints, and Hahnemühle Photo Rag Baryta for my color prints.
Inkjet printing is the printing method typically used to make digital prints. This process, where ink is squirted through jets onto the paper, is known as Giclée printing. The quality of ink, in combination with the chosen paper, will determine the longevity of the print (how long it lasts before fading). Inkjet prints can last up to several hundred years. Your best source of information on print longevity is Wilhelm Imaging Research.
Digital Photo Workflow: ICC Profiles
For the best results when printing, you must tell your printer driver what ink and paper combination you are using. This is done with an ICC profile. ICC stands for International Color Consortium. Printers come with a set of built in ICC profiles for their inks and the most common paper choices. If you use a non-standard paper, then you must download an appropriate profile for your chosen paper and printer combination. These are typically available from the paper manufacturer’s website. The profile will be a file with a .icc extension, and in Windows, there is an option to right-click, and choose “Install Profile” from the context menu.
Printing can be a very challenging, but highly rewarding endeavor. Enjoy!
That’s the end of a simple digital photo workflow.
Next, you may want to read more about photo sharpening.