Join photographer Katherine Keates as she journeys to Africa to explore the Samburu tribal dances through a series of stunning, selective focus and long exposure photos. Katherine brings the story of the Samburu culture and traditions to life through her images and her words.
© Katherine Keates
"
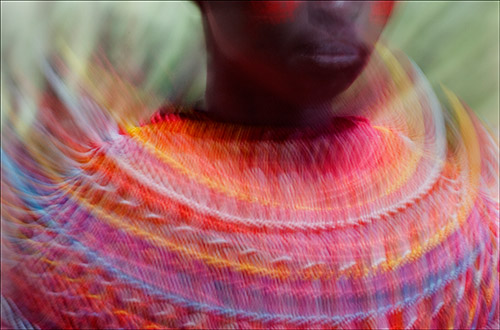
Whirling Dervish"
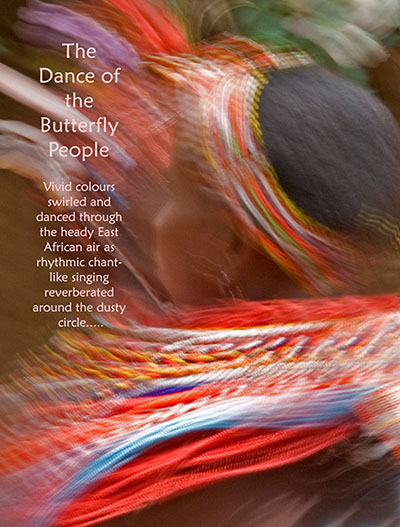
The Dance of the Butterfly People
Story and images by Katherine Keates
© Katherine Keates
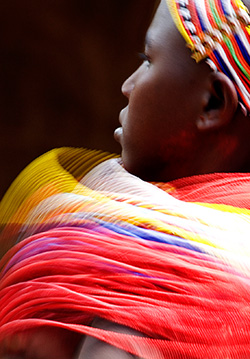
Africa Dance
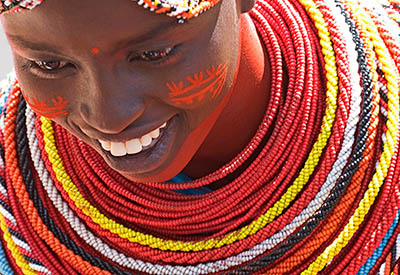
"Dancing Samburu Girl"
Vivid colours swirled and danced through the heady East African air as rhythmic chant-like singing reverberated around the dusty circle. To the hypnotic beat of an ancient chant, women bounced and flaunted their vibrant neck collars made of rope upon rope of delicately strung beads while men jumped in a competition of height and stamina. I was simply spellbound. Uneducated as to the history of this spirited and richly coloured performance of a traditional Samburu dance, there was one thing I knew for sure, and that was that someone was really trying to impress someone. And it was working.
The Samburu people are not so distant relatives to the Maasai although they live just above the equator where the foothills of Mount Kenya merge into the northern desert and slightly south of Lake Turkana in the Rift Valley Province of Kenya in East Africa.
This is a warrior-race of cattle-owning pastoralists. The Samburu, proud of their culture and traditions, still cherish and retain the customs and ceremonies of their ancestors, unlike many other tribes in Kenya who have been more influenced by Western civilization. They are a group that broke away from the main tribe and remained as others pushed further south. The Samburu people are completely dedicated to the raising and nurturing of their livestock, almost to the virtual exclusion of everything else. Their cattle are their life, their wealth, their livelihood and they are profoundly symbolic of status and success within the tribe. To this day, a man still pays a dowry in cattle to the parents of a future bride.
© Katherine Keates
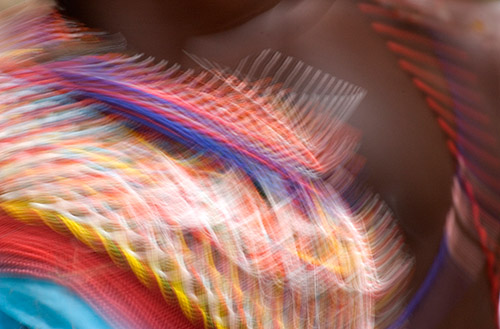
Africa Dance
"Colour in Motion"
In front of the backdrop of the often barren and dusty horizon, the Samburu people bring life and colour to the landscape either out on the plains swathed in their brilliant red cloth or, even more dazzlingly, in their village with their songs and dances. Typically and traditionally, they use no instruments, even drums. They have dances for various occasions of life. But no matter what the occasion, the men primarily dance by jumping, and high vertical jumping from a standing position is like a competitive sport. Most dances involve the men and women dancing in separate circles with specific moves for each sex, while still coordinating the movements of the two groups. The central musical theme of the Samburu dances is a deep reverberating male vocal sound, a rhythmic chanting hauntingly similar to the territorial call of a lion. Warriors move with a series of astonishing vertical leaps, fiercely encouraged by the cries and shouts of other observing warriors while the women bounce, flip and swirl their magnificent collars of beads.
Traditional Samburu settlements are always situated in locations of tremendous geographic beauty, often overlooking spectacular vistas. The aesthetic appreciation of beauty is a major part of Samburu life and their beliefs, and this shows itself most in an incredible attention to physical appearance and adornment. The name "Samburu" was given to them by other tribes, and directly translates as Butterflies or Butterfly People. This was most likely gained because of the impression of delicacy created by their personal ornamentation. However, this delicacy and beauty is not to be mistaken, as it is merely an illusory contrast to their fearsome reputation for hunting and fighting.
© Katherine Keates
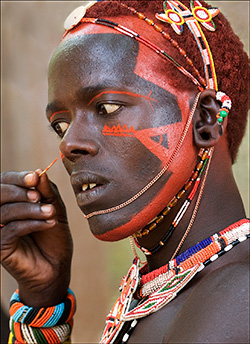
Africa Dance
"The Warrior"
The warriors, known as moran, are the most visually striking members of this unique society and are unquestionably attractive to young girls. They live a rather pleasant and undemanding life with permissive sex for roughly 14 years. Most of them will at one time or another have many lovers who will lavish them with gifts of beads and other trinkets. These young men are flamboyant in their style of dress and are incredibly vain. They frequently apply abstract designs in orange to their faces and red ochre to their heads, necks and shoulders and spend hours adorning each other. Who could doubt that moranhood is considered the best period of a Samburu man’s life.
When adolescent girls attend the dances, which are organized by the moran of their clan, they are deeply aware of the importance of their appearance. They paste red ochre onto their heads, they darken their eyebrows with charcoal, and paint elaborate designs on their faces all the while chattering, teasing and giggling in anticipation of the dance. A small compact mirror or piece of reflective metal is an item of great value to a Samburu, male or female. If the young lady is attractive enough to earn attention from a moran, it is likely that she will become a mistress to him and enjoy his protection. Over the years he will heap beads upon his lover or "bead girl" as a symbol of his affection.
Samburu women do not wear the distinctive large flat necklaces of the Maasai. Instead, they are, from a young age, given single loop bead necklaces by young morans. These precious beaded gifts are given regularly and liberally by young Samburu admirers, and it is not long until the necklaces soon merge to form a thick collar of multihued beads. In the Samburu society, body adornments clearly indicate a person’s social or ritual status, and the exchange of such adornments simply defines the social relationship between the giver and the recipient. And all of this is joyously flaunted in the dances of the ‘Butterfly People’.
Tip
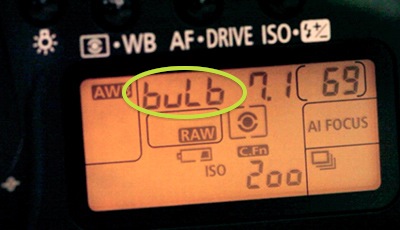
The majority of Katherine’s Africa dance action shots were shot at ISO 100, f/7 to f/11, with shutter speeds between 1/8s and 1/125s, with 1/20s being the most effective.
Shots are hand-held using a Canon 100-400mm IS lens with a polarizer to slow down the exposure.
© Katherine Keates: Africa Dance: "Girl and Collar of Beads"
I moved around the circle with my camera and taking long exposure photos, or using selective focus, swung and moved to the music and tripped the shutter as the moment struck. I needed to capture the mood of this hypnotic dance as the primal beat and visceral sound of the feigned lion call spoke to my own deeply rooted primordial essence while colours of the Butterfly People swirled around my mind’s eye like a whirling dervish. When it was all over, I sat in the dusty circle, oblivious to the heat of the African sun, mesmerized and slightly intoxicated. It was then that I made a silent plea to the generations yet unborn that at least some remnants of tradition hold fast through the relentless winds of time and may it not all be lost.
Tip:
To learn how to create your own long exposure photos, try online photography classes from BetterPhoto.com. I’ve taken three of their online classes, and found them all to be excellent. The one I have linked here is called "The Creative Use of Shutter Speed." It’s a 4-week, online, instructor-led course that will teach you how to get different creative effects through you choice of shutter speed — just like the Africa dance shots Katherine has included here.
–Julie
About Katherine Keates

A photographer for many years, Katherine’s love of photography has led her to explore many avenues in the art and craft of photography. She has explored and photographed in places such as South Africa, Namibia, Botswana, Kenya, Tanzania, France, Israel, Hawaii, Alaska, China, the Galapagos Islands, Ecuador and many North American national parks. She particularly loves to shoot on her home turf in Ontario, Canada.
She strives to present a unique vision and apply an artistic approach to all of her subjects. This national and international award-winning photographer has taught workshops and presented instructional programs. Her prints have been displayed in traditional and unique gallery situations, and in numerous exhibitions, and her work can be found on the walls of private homes and corporate offices.
She has participated on the speakers’ circuit for the Greater Toronto Council of Camera Clubs specializing in Audio Visual presentations and is a qualified international photographic judge. She is currently an active member and Vice President of the Toronto Focal Forum print makers group.
Katherine is also a freelance writer and has had numerous articles and images published in both local and international photographic publications such as BBC Wildlife Photographer of the Year, Photo Life, Pets Magazine, Best of Photography, Local Colour and the CAPA Journal.
Katherine welcomes you to visit her website at:
www.katherinekeatesphotography.com
© Katherine Keates
Africa Dance
"Colour of the Dance"
Next, you may want to read more articles from guest writers on learning digital photography.
Or you may want to learn more about shutter speed in our exposure basics.