Portrait Poses
Learn a new approach to portrait poses that is guaranteed to make your subject love their pictures! This approach avoids formulas, and has you pose your subject according to characteristics of their individual face. Become the master of illusion to hide a multitude of sins, and bring out the best in your subject.
As you learned in the photography portrait tips section, the best poses are the ones that maximize the perceived attractiveness of your subject. That means creating the illusion of symmetry and minimizing the prominence of any irregularities in the face.
When you first approach your subject, scan the face quickly to determine whether there are any asymmetries or irregularities. You must learn to make these observations quickly and discreetly. It can be very disconcerting to your subjects if you spend a long time scrutinizing their faces!
Asymmetry and Irregularities
Tip
If your subject’s face contains multiple irregularities that would result in conflicting choices as to which way to turn the head, you will have to make a decision. use portrait posing to minimize the most significant distraction.
Typically, each person’s face contains some kind of asymmetry. A common example is for one eye to be larger than the other. Another example is when one cheek is fuller than the other.
When positioning your subject, you want to shoot from the side of their face that will minimize the asymmetry. So, if one eye is larger than the other, you should turn the person so that the larger eye is furthest from the camera. Objects that are further away from us are perceived as being smaller, so by putting the larger eye further away, it makes it appear smaller, thereby balancing the perceived size of both eyes.
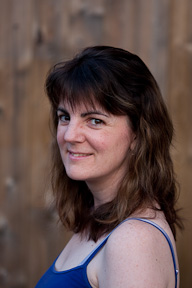
In the images below, you can see that one eye appears bigger than the other in the image on the left, but the two eyes appear equal in size in the image on the right. The only difference in the portrait poses is which side of the subject’s face is turned toward the camera.
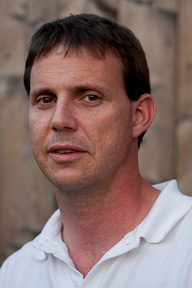 When this subject is shot from his left side, his left eye (on the right side of the image) appears larger than his other eye. A hollow is also visible in his left cheek. © Julie Waterhouse Photography |
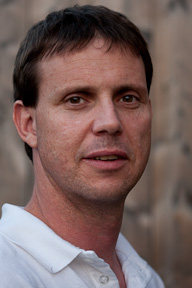 When this subject is shot from his right side, however, his eyes now appear equal in size. The cheek hollow is de-emphasized by turning it away from the camera. © Julie Waterhouse Photography |
Facial irregularities include any distinct feature that stands out from the "norm", such as bumps, moles, discolorations, and — a common one — crooked noses. If you can hide an irregularity by turning it away from the camera, all the better. Otherwise, you can make it appear smaller by turning that side of the face away from the camera. Finally, to disguise a crooked nose, you want to shoot “into” the curve, so that the nose appears straighter.
In the pair of portrait poses above, a hollow is visible in the subject’s left cheek. It is more prominent in the left image. When the right side of the face is closer to the camera, the hollow is further away, partially hidden, and thereby minimized.
Note that this subject has deep-set eyes. Visit the portrait lighting page for techniques to position your strobes to reduce the "hooded eye" look that deep-set eyes can suffer from.
Let’s contrast the portrait poses of straight on versus an angled body.
In the image below, shooting the subject straight on, or square to the camera, reveals two distracting imperfections. Her right eye (on the left side of the image) is lower than her right eye, and her left cheek (indicated with the arrow in the image below) is fuller than her right.
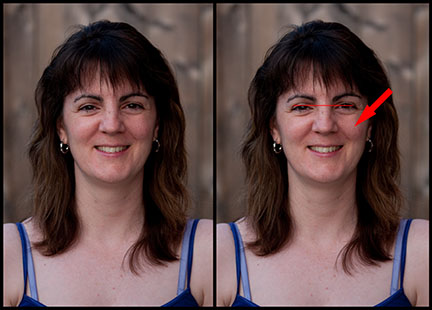
Portrait shot square to subject. Note that one eye is lower than the other,
and one cheek is fuller than the other.
© Peter Ainley
The image below is shot with the flatter cheek toward the camera. This actually places more emphasis on the full cheek, as the bulge is emphasized in profile.
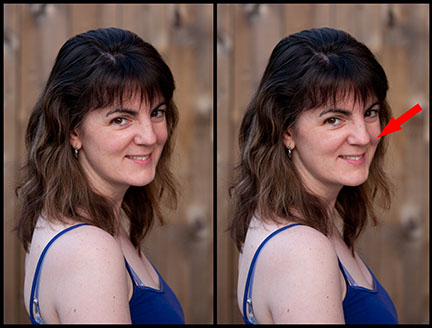
Portrait shot with the flatter cheek closer to the camera.
This has the negative effect of emphasizing the full cheek.
© Peter Ainley
To de-emphasize the fullness of the cheek, the image below is shot "into" the full side of the face. This has the effect of flattening out the cheek and balancing the face.
Portrait shot with the full cheek closer to the camera.
This flattens the full side out to provide overall balance to the face.
© Peter Ainley
Note that we have also solved the problem of the uneven level of the two eyes. By shooting from the subject’s left side, and with the head slightly tilted, you no longer notice that one eye is lower than the other.
To learn lighting techniques to minimize the shadows that are causing both cheeks to look somewhat full, visit the portrait lighting page on reflectors.
Note that correct portrait lighting is also based on characteristics of your subject’s face.
To continue this topic and learn more about portrait poses, go to the next section, where I’ll talk about positioning your subject’s body relative to the camera.