Portrait Lighting
Portrait Lighting
Learn studio lighting techniques that are based on characteristics of your subject’s face, and not on formulaic and complex lighting diagrams. Light your subject in the most flattering way; slim down round faces, and avoid shadows in the wrong places.
Positioning Your Strobes
Portrait photography textbooks are full of complicated lighting diagrams that show you where to place the lights and camera relative to the subject being photographed. What they often fail to take into account is that every human subject is unique. Our faces are all different. As such, the best place to put the lights and camera varies according to the face you are shooting.
First, some terms…
Key light: The key light is the main light source for the portrait. It is the first and most significant (and may be the only) light that the photographer will set up. Its purpose is to highlight the form of the subject. When you are shooting outdoors, the sun may serve as your key light.
- Fill light: The fill light is generally softer (more diffuse) than the key light. You use it to fill in shadows and reduce contrast.
The first question to address is where to place the key light. Just like the decision about where to position the face relative to the camera, this depends on the shape of the face being photographed.
Studio Lighting Techniques: Lighting the Eyes
First you must determine the height at which to place the light. Your range of choice depends on how deep-set the subject’s eyes are. If the eyes are deep-set, then the light cannot be placed too high, or else the brow will cast a shadow over the eyes, giving them a "hooded" look. It’s very important that this not happen. When a person’s eyes are hidden or shaded in any way, it gives the impression that they are not trustworthy. Place the light only to a height where the eyes remain well-lit, and have catch lights. Without catch lights, the eyes appear dull and lifeless.
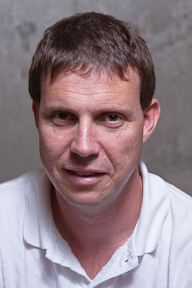 The light is too high; the brow casts a dark shadow over the eyes. © Julie Waterhouse Photography |
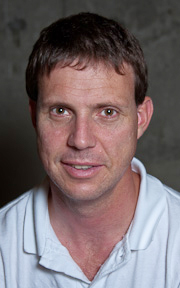 A lower light fills in the shadows under the brow and provides catch lights in the eyes. © Julie Waterhouse Photography |
This subject has deep-set eyes, and a prominent brow. In the image on the left, the eyes are being shadowed by the brow. No catch light is visible. There’s also an unflattering dark shadow being cast under the nose. This looks a bit like a mug shot!
In the image on the right, the light has been lowered to a level to fill in the shadows under the brow, and add catch lights to the eyes, bringing them to life. The subject looks more approachable in this image!
If the eyes are not deep-set and the brow is not prominent, the light can be placed as high as you like, while preserving catch lights. Your decision can then be based on other factors, like the time of day you wish to emulate (the height of the light mimics the height of the sun in the sky), and the photography portrait lighting style you wish to use.
Studio Lighting Techniques: Rounding or Slimming the Face
Tip
Portrait lighting:
One occasion when you might choose to place the key light more directly in front is for an elderly subject. Lighting from the front will reduce the look of wrinkles.
Next you need to decide whether to place the light facing the subject, or off-center. Once again, look to your subject’s face for guidance. Determine its shape. It may be round, oval, heart-shaped (an upside-down triangle), or square.
Generally, you want to minimize the roundness of a very round face by elongating it a little, or soften the edges of a very square face. Think of a round face like moon. To produce a full moon, the sun is shining directly at the moon. When the sun is positioned so that it shines from the side, you get a "slimmer," crescent moon. In the same way, by placing the light off to one side of a round face, you put the far edge of the face into shadow, immediately narrowing it.
In contrast, you may want to fill out a very narrow face. By placing the light more centrally, you maximize the amount of the face that’s visible in the light, thereby rounding it out (like the full moon).
Portrait Lighting: Part II – "Choosing Your Lighting Style" gives more detail on positioning the lights to change the appearance of the face shape.
Studio Lighting Techniques: Creating Mood
How many lights do you use? At what strength? The photography portrait lighting you choose depends on the purpose of the shot, and the mood you are trying to create. Is this a glamour shot, or a corporate portrait?
If you use a single key light, with no fill light, you will achieve very dramatic light. You will have high contrast (particularly if the background is not lit), and more shadows. The "harder" (more focused, less diffuse), the key light, the more contrast, and the more drama.
A fill light decreases contrast and reveals more details in the dark areas of the face. The fill light should be less intense, and more diffuse ("softer") then the key light. The lower the intensity of the fill light, the more dram remains in the shot. Having a fill light with more than half the intensity of the key light will produce a low-contrast image with less drama.
It is common to places the fill light in line with the direction of the camera lens. The fill light will shine from just behind and above the photographer.
As an alternative to a fill light, you can use a reflector to "bounce" the key light back towards the subject to fill in shadows.
Photography Portrait Lighting: Using Reflectors
Reflectors are used to reflect, or bounce, light back onto your subject, thereby reducing shadows. They can be critical when doing portrait photography, to minimize harsh shadows on the face.
Reflectors are usually white, silver or gold. The color of the reflector will affect the color of the light on your subject. A gold reflector will warm up your subject.
You can purchase collapsible, two-sided reflectors at your local camera store. You can also easily make a reflector at home by gluing aluminum foil onto a piece of cardboard.
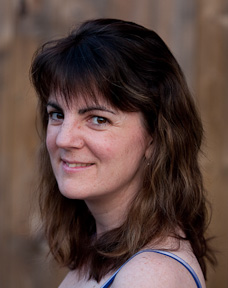 The cheeks are emphasized by strong shadows. There is also a shadow under the chin. © Peter Ainley |
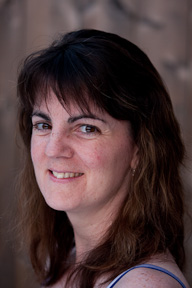 Using a reflector to bounce light toward the subject fills in deep shadows. © Peter Ainley |
In the portrait lighting on the left, there are dark lines under this subject’s cheeks which make both cheeks look more full. To get rid of these, use a reflector positioned below the subject’s face to bounce some light at the subject, and fill those shadows. (Note that in this case, I actually prefer the image on the left, which has more definition in the cheeks).
Photography Portrait Lighting: Using Diffusers
A diffuser is made of translucent material, allowing some, but not all light to pass through. In this way, it softens the light, and reduces glare and harsh shadows. Diffusers eliminate unattractive contrast, and even out the tonality in the image. . A diffuser is held between the subject and a light source in order to soften that light source. It can be used with an artificial light, or with the sun; either way, it behaves the same.
Next, learn more about the four traditional lighting styles of photography portrait lighting: Broad, Short, Butterfly and Rembrandt.