Digital Photography Histogram: Interpreting the Graph
Digital Photography Histogram:
Interpreting the Graph
What can a digital photography histogram tell you about your image? What information does the shape of the graph give you, and how to you correct your image when the image histogram indicates a problem? In this section, we explain all that and more!
Interpreting the Digital Photography Histogram
First of all, let me set the record straight. There’s no such thing as a “bad” histogram! I cringe when I hear people say that. A histogram just tells you facts about your image. It may tell you that you have a problem with your image, but a histogram is not inherently "bad" or "good!" Understanding histograms helps you to know how to improve your image.
The following histogram is pushed up along the left side of the graph. We call this "clipping," i.e., the histogram is "clipped" on the left. This tells us that a lot of pixels in our image will be rendered as pure black, which means that we have lost detail in that area of the image. We refer to this as our shadows being "blocked up."
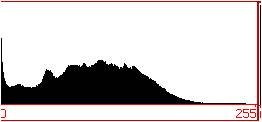
Histogram showing blacks “blocked up”
Image source: dpreview.com
To correct blocked up shadows, you must increase your exposure. Understanding histograms, we know that this will have the effect of shifting the histogram to the right.
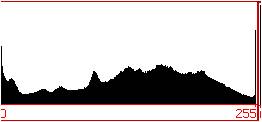
The next digital photography histogram, shown below, has the opposite problem. The histogram is pushed up against the right side of the graph. This tells us that a lot of pixels in our image will be rendered as pure white. Just as in the last case, this means that we have lost detail in that area of the image, and we refer to that as our highlights being "blown out" or "burnt out."
Histogram showing whites “blown out”
Image source: dpreview.com
To correct blown out highlights, you must reduce your exposure. Understanding histograms, we know that this will have the effect of shifting the histogram to the left.
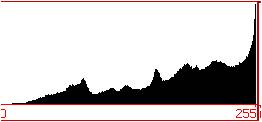
The digital photography histogram below is clipped on both left and right, so we have a combination of the above two problems: both blocked up shadows and blown out highlights at the same time. This is an indication that the dynamic range (the range of contrast from light to dark) of the scene was greater than what the camera could capture. This can easily happen on a bright, sunny day. There are about 12 stops of light in an average sunny day scene. Although the human eye has the capacity to see detail in the highlights and shadows under such conditions, the camera cannot. It is limited to capturing only about 5 stops of brightness.
Histogram showing that the image’s dynamic range
has exceeded what the camera can capture.
Image source: dpreview.com
To address this problem is more difficult. If we increase our exposure to fix the blocked up shadows, we just aggravate the blown out highlights more, and vice versa. In this situation, we somehow need to reduce our dynamic range.
A graduated neutral density filter used in the field can help. This is a filter that is dark gray at the top, and fades to clear at the bottom. When shooting a landscape, for example, the filter can be placed over the lens with the darker part lined up to cover a bright sky, and the clear part to cover the foreground. This effectively darkens the sky relative to the land, and reduces the overall dynamic range of the image.
The problem can also be solved using HDR, or high dynamic range techniques. This involves taking multiple images of the same scene (using a tripod so that they are identical) at different exposures. At least one image will have properly exposed each part of the scene. The images are then combined using software to produce a complete well-exposed image.
Finally, if you can, come back to the scene at a different time of day when the light is less harsh, and there is not as much contrast. The last solution may sound facetious, but is meant seriously.
The final digital photography histogram, shown below, has no pixels that are white, or even near-white, and no pixels that are black, or even near-black. The majority of the pixels are in the mid-tones. The image corresponding to this histogram will appear flat, without much contrast. This can easily be adjusted in a camera raw editor to increase the contrast.
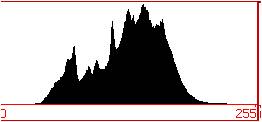
Histogram showing low contrast image.
Image source: dpreview.com
Understanding histograms:
Next, you may want to visit another digital photo tips page to see some histogram examples, showing actual images and their corresponding histograms.