Photo Challenges: October 2010


Photo Challenges: October 2010


Photo Challenges:
October 2010

People

Life is all about the people in it, and our relationships to them. This month’s contest is dedicated to the people in your life. Family, friends, even strangers whom you meet, and who compel you to lift your lens to capture a connection. Let’s see the people in your life! Get as funky as you want!

Enter your super-amazing photos in our photo contests. The winning image will be featured on the Ultimate Photo Tips homepage for all of the following month. One entry only each month per person, please!

Submit your image.

See what other people are submitting, and vote for your favorite:
View other entries.


My People!

people photography
All Decked Out
© Julie Waterhouse Photography


people photography
A Quiet Moment
© Julie Waterhouse Photography


people photography
California Smoothie
© Julie Waterhouse Photography


people photography
Baby
© Julie Waterhouse Photography


people photography
The Kiss
© Julie Waterhouse Photography


***C2_invitation_23930751***


Photo Challenges: October 2011


Photo Challenges: October 2011


Photo Challenges:
October 2011

Monochrome

We’re taking away the color this month! Monochrome photographs have a single hue, rather than capturing the full color of your subject. This creates a more interpretive, and less realistic rendition.

How do you know which images will work best as monochromes? Photographs that rely on tonal contrast and variance, rather than on color contrast, to reveal forms, lines and textures are the ones that will work best as monochromes. If the story of the image can be expressed through its tones, try it as a monochrome. It may be that the color distracts from the story more than it adds.

Your submitted image may be true black and white, or it may be toned with a single hue. I will also accept subtly split-toned images. This is where the highlights and shadows are each toned with a separate hue. Often the highlights will be rendered in a warm hue, and the shadows in a cool hue. Toning and split-toning can be done with post-processing software such as Adobe Lightroom.

Read the rules. One entry only each month per person, please!

Enter your super-amazing photos in our photo contests. The winning image will be featured on the Ultimate Photo Tips homepage for all of the following month.

Submit your image.

See what other people are submitting, and vote for your favorite:
View other entries.


Life in Black and White

photo challenge
Dinner Plates
© Julie Waterhouse


photo challenge
At the Window
© Julie Waterhouse


photo challenge

Upturned Glass
© Julie Waterhouse


photo challenge
In the Parking Lot
© Julie Waterhouse


photo challenge
Guestroom Lamp
© Julie Waterhouse


***C2_invitation_26855093***


Photo Challenges: September 2010


Photo Challenges: August 2010


Photo Challenges:
September 2010

A Different Perspective

I’ve recently been adding content to the site that focuses on creativity. One of the ways to be creative is to get out of your box and take a different perspective when you shoot. This month, I encourage you to shoot some images from a different point of view. Too often, we shoot from our own eye level. Climb a ladder! Lie on your stomach! Shoot from above or below and look at your subject in a way that you don’t normally see it. Take a different perspective, and share what you see with all of us.

Enter your super-amazing photos in our photo contests. The winning image will be featured on the Ultimate Photo Tips homepage for all of the following month. One entry only each month per person, please!

Submit your image.

See what other people are submitting, and vote for your favorite:
View other entries.


My Perspective


photography perspective
Florence Cafe
© Julie Waterhouse Photography


photography perspective
Tulips
© Julie Waterhouse Photography


photography perspective
Canola
© Julie Waterhouse Photography


photography perspective
Spoons
© Julie Waterhouse Photography


***C2_invitation_23777863***


Photo Challenges: September 2011


Photo Challenges: September 2011


Photo Challenges:
September 2011

It’s Hip to Be Square!

In the digital world, you don’t have to own a medium format camera to create square images. A little cropping afterwards will do it! Just set your crop tool to 1×1 in Lightroom, or hold down the Shift key in Photoshop while cropping, and Presto! You have a square image.

It’s good to remember that we don’t always have to accept the aspect ratio that comes out of our cameras as the one in which we present our image. You should choose the format that best suits your image.

There’s something appealing about the balance and symmetry of a square crop. Does every image work as a square, though? No. That’s what this month’s challenge is all about. Find those images that are improved and enhanced with a square format. Sometimes, symmetrical subjects can work well as squares, like my first image below. But asymmetry can work too, so experiment! Try different crops; you’ll know in your gut when it "feels right." That means you’ve achieved a visual balance. If that turns out to be a square, then submit it here!

Get out there and start shooting — and then get out those virtual scissors for some square cropping!

Read more about cropping photos.

Read the rules. One entry only each month per person, please!

Enter your super-amazing photos in our photo contests. The winning image will be featured on the Ultimate Photo Tips homepage for all of the following month.

Submit your image.

See what other people are submitting, and vote for your favorite:
View other entries.


Okay, I’m Square!

photo challenge
Calm Within Chaos
© Julie Waterhouse


photo challenge
Bowl and Plate.
© Julie Waterhouse


photo challenge

Balloons
© Julie Waterhouse


photo challenge
Looking Up
© Julie Waterhouse


photo challenge
Calla Lily
© Julie Waterhouse


photo challenge
A Drizzle of Honey
© Julie Waterhouse


***C2_invitation_26624243***


Photograph Composition: Examples and Exercises


Photograph Composition: Examples and Exercises


This section is packed with examples of photograph composition along with exercises to test whether you’ve grasped the concepts from our composition section. Check your skills in seeing, choosing, arranging and framing picture elements.

Serenity
© Julie Waterhouse Photography

Answers to all questions follow the exercises, and are linked from within each exercise. Sometimes, there’s no right or wrong! Your opinion may differ.

Exercise #1


photo composition
© Julie Waterhouse Photography

  • 1. What is the most prominent design element in this image?
  • 2. Does it say:
    1. (a) strong and confident?
    2. (b) sensual?
    3. (c) dynamic change?

For a hint, review this visual design elements section.

Find the answer.


Exercise #2


photo composition
© Julie Waterhouse Photography

  • 1. In this image, what classic photography rule of composition does the placement of the horses follow?
  • 2. Besides their position within the frame, why else is your eye drawn to the horses?
  • 3. Do you think it is okay to have only a little dark green grass and a lot of light area in the image? Why or why not?

For a hint for #1, review this section on subject placement

For a hint for #2 and #3, review this photograph composition section.

Find the answer.


Exercise #3


photograph composition
© Julie Waterhouse Photography

  • 1. How could this composition be improved?

For a hint, review this section.

Find the answer.


Exercise #4


photograph composition
© Julie Waterhouse Photography

  • 1. Does this photograph composition have any distractions?
  • 2. How do you feel about the overall balance of the image, once any distractions are removed?
  • 3. What is one element of the photograph composition that does work, in terms of subject placement?

For a hint for #1, review this section on distractions.

For a hint for #2, review this section on balance.

For a hint for #3, review this section on subject placement

Find the answer.


Exercise #5


photograph composition
© Julie Waterhouse Photography

  • 1. What visual design element is most prominent in this image?
  • 2. What feel does the element in (1) give to the image?
  1. (a) stable?
  2. (b) highly dynamic?

For a hint, review this section on visual design elements.

Find the answer.


Exercise #6


photograph composition
© Julie Waterhouse Photography

  • 1. What rule is employed in this photograph composition?
  • Note: there are (at least 🙂 two reasonable answers here.

For a hint, review this rule or this one.

Find the answer.


I hope you found these exercises helpful!
The answers start here.


Answer to Exercise #1


photo composition
© Julie Waterhouse Photography

1. The most prominent visual design element is the red line on the cactus. It is an S-curve that leads your eye through the image.

2. (b) It gives a sensual mood to the image.

Go to Exercise #2.


Answer to Exercise #2


photo composition
© Julie Waterhouse Photography

1. The horses are placed (approximately) according to the photography Rule of Thirds.

2. Your eyes are drawn to the horses because they are very dark in relation to their surroundings. This contrast gives them a lot of visual weight.

3. The strip of vibrant green grass at the bottom balances the upper light rectangle. Although smaller in size, its strong color gives it a lot of visual weight.

Go to Exercise #3.


Answer to Exercise #3


photograph composition
© Julie Waterhouse Photography

1. The blank sky adds nothing to the image. It would benefit from cropping, as follows. After the crop, you see that the picture space is now divided into a horizontal strip of water that takes up a third of the vertical space, and a strip of land that takes up two thirds of the vertical space. The image is now following the photography Rule of Thirds.

photograph composition
© Julie Waterhouse Photography

Go to Exercise #4.


Answer to Exercise #4


photograph composition
© Julie Waterhouse Photography

1. The black sections in the bottom left corner carry a lot of visual weight and are distracting. Your eye is pulled to them, away from the main subject.

2. Once the black is removed, I find that there’s too much white on the left side of the image that keeps pulling my eye over. It overwhelms the yellow because of it’s brightness, and leaves the image unbalanced.

3. The one thing the image has right is the placement of the lily stamen in the top right thirds position. Even if the image is cropped to remove the excess white, this placement in the thirds position is preserved.

The following crop addresses the problems of (1) and (2), while preserving the rule of thirds in (3).

photograph composition
© Julie Waterhouse Photography

Go to Exercise #5.


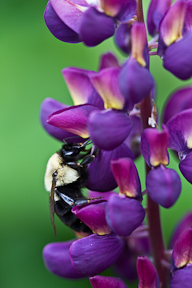
Answer to Exercise #5


photograph composition
© Julie Waterhouse Photography

1. The strongest visual design element in this photograph composition is a triangle.

2. (a) The shape of the triangle is quite regular – it’s almost an equilateral triangle. That gives the image stability.

Go to Exercise #6.


Answer to Exercise #6


photograph composition
© Julie Waterhouse Photography

1. The first possible answer is that the photo uses the "Major-Minor" rule. The tree on the left is echoed by the small tree on the right hand side.

The second possible answer is that the image uses the concept of visual weight to balance it. The large tree on the left is balanced by the smaller trees on the right. Although they are not equal in size to the large tree on the left, the smaller trees on the right carry enough visual weight to balance the larger one. They are more dense, making them a dark spot against the sky. They are also close to the edge of the frame.

A third (!) possible answer is that the photograph composition employs the rule of thirds, since the land takes up about one third of the vertical picture space, and the sky takes up about two thirds. The "head" of the large tree also sits roughly in the thirds position.


Photographic Creativity


Photographic Creativity


All of us struggle to improve our creativity. Our special guest writer Barbara Bender, a professional freelance photographer and writer, brings us some welcome encouragement to help us fight our fears, and take some creative risks. Enjoy!

Do It Anyway

by Barbara Bender


photographic creativity
© Barbara Bender

In spite of the growing wealth of material to suggest ways to improve photographic creativity, some people have difficulties in this area. While they may be excellent technical photographers, they often claim that they just aren’t very creative.

All of us have the potential to be creative but for many, creativity can be hampered by the fear of disapproval or the fear of failure. Creativity can only flourish in an atmosphere of experimentation, risk taking, playfulness, curiosity and a sense of adventure. It is only possible when the excellence of the final product is irrelevant. Making our photographs in this way is almost impossible if we have these fears and allow them to get in our way.

Often we are unaware that we even have these fears. Becoming aware of them, and acknowledging them is the first step in working with them. Then, in spite of the fears, do it anyway. Take the risk.

A photograph is a visual expression of ourselves and how we feel about the things we see. What and how we photograph can say a lot about who we are. Exposing ourselves in such a way can make us feel vulnerable, and this can be scary. We fear feeling foolish or being perceived in a negative way.

Make the photograph you are inspired to make even if you feel intimidated by the judgments of others. It is difficult to freely play and indulge your curiosity if you feel self conscious and inhibited. Don’t let the fear of feeling foolish stop you from exploring a creative idea. Lie down on the busy sidewalk in order to get an unusual angle for photographing your subject. You might get looks from passersby, but you also might end up with a fabulous image with a different, creative point of view.

Shoot what interests and attracts you, even if you fear that others will disapprove. Don’t let this stop you from photographing items that are not considered traditionally photogenic. Instead, find interesting ways to photograph the really common, mundane things that most people never notice. Why restrict your still life subject matter to vases of flowers or bowls of fruit when the light falling on the roll of toilet paper in a captivating way beckons? Follow your own interests and instincts, even if they are very different than what others are doing. Your vision can be fresh and unique … creative.

photographic creativity
© Barbara Bender

Many of us are afraid to fail, and as a result, play it safe. We continue to “see” and capture our images in ways that have been successful in the past. We use the same techniques that we feel competent and comfortable with when we process our work. We often create excellent images, but after a while, these images no longer show photographic creativity, for us, even though others might praise them. Experimenting with new ideas and techniques when there is little or no certainty about the quality of the outcome can be very scary for some of us. The fear of failing holds us back.

Explore your photographic creativity…

"Make the photograph you are inspired to make even if you feel intimidated by the judgments of others."

Recognize this fear and do it anyway. Photograph subject matter you’ve never worked with before. Get out of your comfort zone. Even if you have no idea how to approach photographing the unknown, experiment with it anyway. Try different lenses and use camera motion techniques that you usually avoid because you don’t feel competent in their use. Play with different shutter speeds and apertures even if you think they may be inappropriate. Shoot in “bad” light and try to figure out how to work with it. Be curious about tools in Photoshop that you’ve never used, and play with them. Use familiar tools in the opposite way to what you normally do, or exaggerate their effects enormously.

photographic creativity
© Barbara Bender

Chances are you will make lots of mistakes and create some really horrid photographs. So what! You will learn, and chances are you may also make some really outstanding ones too. You will never have the opportunity to realize your potential for photographic creativity if your fear of failing and making a fool of yourself prevents you from trying.

You can’t be creative and cautious at the same time. So, feel the fear, and then do it anyway!


About Barbara Bender


Barbara Bender

Barbara Bender is a freelance professional photographer and writer who uses various creative techniques, emphasis on design, and simple, often graphic composition to make photographs which are frequently expressive in nature. Her photographs have been featured in such publications as Nature’s Best Awards Issue, Black and White Magazine, and Color Magazine. A series of articles on photographic Creativity and Playfulness was featured in PhotoLife Magazine in 2010. Over forty-five of her images have been used as book covers for Guernica Editions. As an active member of the Greater Toronto Council of Camera Clubs, she gives presentations and workshops on various photographic topics.

www.BarbaraBenderPhotoArt.com


Next, you may want to explore your photographic creativity with some creative photography ideas.

Ultimate Photo TipsWill Help You Take Photos That “Wow”


Ultimate Photo Tips Will Help You Take Photos THat Wow


Ultimate Photo Tips
Will Help You Take Photos That “Wow”

Ultimate Photo Tips is here to:

  • teach you to take photos you can be proud of through helpful photo tips, articles and videos
  • inspire you with beautiful images and original ideas
  • draw out your inner creativity through exercises and examples

Sound interesting? Enter your name and email below to get my free updates:


What Readers Are Saying About Ultimate Photo Tips

"I’m currently studying a professional photographic development course to realise a lifelong dream of running a successful freelance photography business, over the past weeks your website has been an amazing resource of information and inspiration … And I would like to thank you for all your hard work sharing your obvious love of all things photo. Thank you." ~Steven

"Hi Julie, I live in Australia and have just come across your website. I am a beginner photographer and have done a few courses and read a photography book front to back but havn’t enjoyed or learnt as much as I have since reading your information. You make it simple to understand and you examples are fantastic. I wish I had found your site months ago. Well done on a great site and supplying such useful and easy to understand information. I am hoping to submit photo’s to your monthly challenges. Thankyou!!" ~Lisa

"Just a couple of lines to complement and congratulate you on your superb and inspiring images. Your well-designed,inviting and "giving" webpage is an object lesson in ‘how to’ for others. I am blown away!" ~Suresh

"This is just to say thank you for putting your great website together. I find it really inspirational and informative. The piece on Visual weight was absolutely fascinating reading. I also really like your ideas section, I’m going out to buy some food coloring and some silver foil tomorrow. I’m also intending to photograph my bathroom! […] Thank you so much. More power to you." ~Craig

Become a More Creative Photographer

Did You Know?

Being creative makes you happier, and being happy makes you more creative. It’s the perfect positive feedback cycle! Also, being good at something helps you enjoy it more, and feel more fulfilled.

What is creativity? Creativity encompasses both vision and execution. This means that photographic creativity has two parts: the art and the craft. You must first be inspired with a great idea, but then you must also translate that idea into a final image so that it can be understood by your viewer.

I firmly believe that both the technical AND the "artistic" aspects of creativity can be learned through training and practice. Here on Ultimate Photo Tips, I want to provide articles, images, exercises, and challenges that will both inspire and teach creativity so that you can master the skills necessary to take great images, and reach your full creative potential.

Do You Fear That You Are Not Creative Enough?

Everyone has the potential to be creative! If I can do it, so can you!

Many people tell me that they don’t think they are creative. Often those people come from technical or scientific backgrounds where logic and analytical thinking are emphasized, often (sadly) at the expense of creativity.

Good news! Creativity is fully compatible with being analytical. Research shows that the conventional wisdom of left-brain logic versus right-brain creativity is flawed. Creativity, and in fact, all complex activities, integrate both left and right brain thinking.

So take heart! You won’t find a more analytical thinker than I am! I spent nearly 25 years of education and working in a highly technical field. Frankly, I felt sapped of my creativity. That creativity was, however, still inside me, and just needed re-awakening. Photography has been the catalyst that has put me back in touch with my creativity — and my happiness.

I look forward to sharing your creative journey through photography, and hope you will revisit Ultimate Photo Tips many times to learn and be inspired.

Are you ready to kick your photography up to the next level? Then enter your name and email below to get my free updates:


About Julie

portrait example
© Peter Ainley

Julie Waterhouse is the author and photographer behind the Ultimate Photo Tips website. Julie is a fine art photographer and photography instructor.  She resides in Markham, Ontario, Canada, just a short drive from the local farmland and woods she loves to photograph.

Her current work is focused on two themes. The first is Ontario farmland. She grew up in a rural area outside Ottawa, and feels very much at home in that environment. She has recently combined this subject matter with her new interest in night photography. The second theme is macro photography of natural subjects, with a special passion for flowers. This reflects the love of details that pervades all aspects of her life. Julie has created a beautiful book that pairs her flower images with inspirational quotes.

She is passionate about photography, and loves to teach workshops, coach one-on-one, and share her passion in any way she can. This website was born out of a desire to reach even more budding photographers.

She has taken photographic courses and workshops from Freeman Patterson, Tony Sweet, Richard Martin, John Paul Caponigro, and Lance Keimig. Julie’s photography has won numerous awards, and her prints have been exhibited internationally.

Want to Make Photos that "WOW?"

If so, I can help you learn:

creativity exercises

  1. the A-Z of exposure and composition
  2. how to translate what you see into a photo that conveys how you feel
  3. how to be a more creative photographer

Just enter your name and email below and click “Get Updates!” to receive my friendly and helpful newsletter. Plus, get your welcome bonus, “12 Fun Exercises to Inspire Your Photographic Creativity.”


I am also interested in news about…


(it’s free!)

Photography Rules of Composition: Positioning Your Subject

Photography rules of composition: the next one that you must understand is how to properly position your subject in the frame. You want to break the rules? Well, you need to master them first, so read on!

Positioning Moving Objects

Objects that can move, like people, animals, or cars, should be given room in the picture space to move into. If you put your frame boundary right in front of a moving object, it either looks like it’s going to “hit a wall,” or that it’s moving right out of the picture.

photography composition
The horses have somewhere to move into.
© Julie Waterhouse Photography

photography composition
The horses have unnecessary room behind them,
but nowhere to go but out of the frame.
© Julie Waterhouse Photography

Leave space in the picture frame “open” in front of a moving object. The fast the object appears to be moving, the more space it can handle in front of it. The view imagines that the subject continues to move, and visualizes it moving through the picture space.

photography rules of composition
Lots of room to run.
© Peter Ainley


Positioning Heads

Avoid having a line pass “through” someone’s head in your photograph. It is very distracting.

photography rules of composition: subject positioning
The back of a couch creates a line through the baby’s head.
© Peter Ainley

photography rules of composition: subject positioning
Change your shooting angle to get rid of the line.
© Peter Ainley

Move around and change your shooting angle so that what is behind your subject is as neutral as possible. Try to get down and shoot at the level of your subject, too.

photography rules of composition: subject positioning
The flower bed creates a line through the baby’s head.
© Peter Ainley

photography rules of composition: subject positioning
Change your shooting angle to
get rid of the line.
© Peter Ainley


Pointing

If you have an element in your photography composition that “points” (it doesn’t have to be a person, it could be an inanimate object like a tree branch, too), then it’s a good idea to keep it pointing into the picture space, and not out of it. The viewer’s eye will tend to follow the direction of the lines in your image, so you don’t want to point them right out of your picture!


I recommend you read the next of the photography rules of composition: visual weight.

Photo Sharpening


Photo Sharpening


What is photo sharpening? Discover methods of sharpening like the unsharp mask and high pass sharpening. Learn when and why to apply sharpening to your images.

What is Sharpening?

Sharpening is one of the digital photography basics you need to master. Sharpening is a process that’s used to enhance the appearance of sharp edges in your image. It is accomplished through local contrast adjustments, i.e., increasing the contrast along edges to make them appear sharper.


Methods of Sharpening


Unsharp Mask (Photoshop)

Tip

Digital Photography Basics:

Don’t overdo your sharpening, or else you will see an unattractive and distinctive halo effect around your edges.

A common software technique in use for photo sharpening is the "unsharp mask." While the name is seems counter-intuitive, it makes sense when you understand how it works. It uses a unsharp (blurred) positive to create a "mask" of the original image. That mask is then combined with the image negative to create the impression that the resulting image is sharper than the original.

High Pass Sharpening (Photoshop)

One problem with the unsharp mask method of sharpening is that it can magnify the noise in an image. Another sharpening technique to use instead is Photoshop’s high pass filter. The steps of the technique are as follows:

  1. 1. Create a new merged layer of everything below.
  2. 2. Apply the high pass filter (Filter->Other->High Pass) using a radius of 10 (or to taste).
  3. 3. Choose a layer blend mode of Overlay (Soft Light, or Hard Light may be used too, creating a slightly different effect – experiment!)
  4. 4. Zoom in to 100% to see the effect, and reduce the layer opacity until you are no longer over-sharpened.

Another advantage to the high pass sharpening technique is that it allows you to keep sharpening on its own layer.

When and Why to Sharpen

Any time we convert light into pixels, we introduce a degree of softness to the image because we are turning continuous gradations of tone and color into a fixed grid of pixels. We want to correct this with photo sharpening.

We may also want to introduce extra sharpness into our image, or parts of our image, for creative purposes, such as emphasis.

Finally, when we print our image or display it on a screen, the output device we use may also introduce softness (e.g., in converting pixels to ink dots) that we wish to counteract.

My favorite photo sharpening software is a plugin to Photoshop made by Pixel Genius, called PK Sharpener. It splits sharpening into three distinct stages that correspond to the above reasons for sharpening:

Capture Sharpening

Capture sharpening is done immediately on your raw image before any editing is applied. It’s intended to compensate for the softening introduced by the actual process of converting the light to pixels.

Creative Sharpening

PK Sharpener provides varying degrees of edge sharpening that can be applied to the entire image, or "brushed on" to selected areas. The global sharpening can compensate for things like haze or overly shallow depth of field. The local sharpening can be used to add emphasis, for example to eyes in a portrait.

Output Sharpening

Options for output sharpening depend on the targeted output device: a monitor, matte paper, glossy paper etc., and the resolution of the image.


Next, you may want to:

Return to the next stage of the Digital Photo Workflow.

or, visit a digital photo tips page to learn about the Live View feature of many DSLR cameras, and how it can help with focusing.

Photo Tips Blog


Photo Tips Blog


This blog page reports what’s new about the Ultimate Photo Tips website. It lets you know whenever new pages appear, and keeps you up to date on other postings or news about Ultimate Photo Tips.

To subscribe, just right-click on the orange XML/RSS button at the bottom of the left navigation bar, choose "Copy Link Location" (Firefox) or "Copy Shortcut" (Internet Explorer) or "Copy Link to Clipboard” (Safari), and then paste the URL into your RSS reader. Or click on any of the specific buttons if you keep a personalized home page on Google, My Yahoo!, My MSN, or Bloglines.

Click on “What’s an RSS feed?” for more detailed instructions. Your RSS reader will alert you when pages have been added or updated.

photo tips blog
© Julie Waterhouse Photography


Here’s what’s new right now!

***SITE-BLOG***