Worth a Thousand Words: Issue #025
|


Photography Tips & Tricks
|

© Julie Waterhouse
My goal for Ultimate Photo Tips is to help you, my readers, feel happier and more fulfilled. Wow! That sounds like a lofty ideal. How do I plan to achieve it? That’s easy! 🙂
Being creative makes you happier, and being happy makes you more creative. It’s the perfect positive feedback cycle! Also, being good at something helps you enjoy it more, and feel more fulfilled when you do it. If I can help you to become a better and more creative photographer, then I will achieve my goal of making you feel happier and more fulfilled.
Everyone has the potential to be creative! If I can do it, so can you!
Many people tell me that they don’t think they are creative. Often those people come from technical or scientific backgrounds where logic and analytical thinking are emphasized, often (sadly) at the expense of creativity.
Good news! Creativity comes from the heart! It’s about translating how you feel into a photograph that communicates to your viewers.
More good news (written to appeal to you technically-trained folk! :-)! Research shows that the conventional wisdom of left-brain logic versus right-brain creativity is flawed. Creativity, and in fact, all activities, integrate both left and right brain thinking.
So take heart! You won’t find a more analytical thinker than me! After nearly 25 years of education and working in a highly technical field, I felt sapped of my creativity. It was, however, still inside me, and just needed re-awakening. Photography has helped me to get back in touch with my creativity — and my happiness.
What is creativity? Creativity encompasses both vision and execution. This means that photographic creativity has two parts: the art and the craft. You must first be inspired with a great idea, but then you must also translate that idea into a final image so that it can be understood by your viewer.
I firmly believe that both the technical AND the "artistic" aspects of creativity can be learned through training and practice. Here on Ultimate Photo Tips, I want to provide articles, images, exercises, and challenges that will both inspire and teach creativity so that you can master the skills necessary to take great images, reach your full creative potential, and become happier and more fulfilled!

© Peter Ainley
Julie Waterhouse is the author and photographer behind the Ultimate Photo Tips website. Julie is a fine art photographer and photography instructor. She resides in Markham, Ontario, Canada, just a short drive from the local farmland and woods she loves to photograph.
Her current work is focused on two themes. The first is Ontario farmland. She grew up in a rural area outside Ottawa, and feels very much at home in that environment. She has recently combined this subject matter with her new interest in night photography. The second theme is macro photography of natural subjects, with a special passion for flowers. This reflects the love of details that pervades all aspects of her life. Julie has created a beautiful book that pairs her flower images with inspirational quotes.
She is passionate about photography, and loves to teach workshops, coach one-on-one, and share her passion in any way she can. This website was born out of a desire to reach even more budding photographers.
She has taken photographic courses and workshops from Freeman Patterson, Tony Sweet, Richard Martin, John Paul Caponigro, and Lance Keimig. Julie’s photography has won numerous awards, and her prints have been exhibited internationally.
Ultimate Photo Tips on Facebook
Julie Waterhouse Photography on Facebook
Julie on Twitter (@juliewaterhouse)
Julie on Pinterest
Julie on LinkedIn
Julie on Google+
Julie’s 365 Project on Flickr
Below are all the back issues of Worth a Thousand Words, the e-Zine for this website.
June 20, 2012 — Worth a Thousand Words, Issue #026 — Wedding Photography Tips and more!
May 16, 2012 — Worth a Thousand Words, Issue #025 — Water: Instead of Drinking it, Try This!
April 18, 2012 — Worth a Thousand Words, Issue #024 — Virtual Lighting Studio
March 21, 2012 — Worth a Thousand Words, Issue #023 — Dance of the Butterfly People
February 15, 2012 — Worth a Thousand Words, Issue #022 — Fabulous Family Photos
January 18, 2012 — Worth a Thousand Words, Issue #021 — Winter Photography
December 21, 2011 — Worth a Thousand Words, Issue #020 — Holiday Photo Books
November 16, 2011 — Worth a Thousand Words, Issue #019 — Cool Camera Simulator!
October 19, 2011 — Worth a Thousand Words, Issue #018 — Take Risks!
September 21, 2011 — Worth a Thousand Words, Issue #017 — Get Moving!
August 17, 2011 — Worth a Thousand Words, Issue #016 — A Honey of a Creativity Project For You
May 18, 2011 — Worth a Thousand Words, Issue #013 — You Could Be Wasting Your Time Editing Photos!
April 20, 2011 — Worth a Thousand Words, Issue #012 — Garbage In, Garbage Out
March 16, 2011 — Worth a Thousand Words, Issue #011 — Are You Making the Best Use of Color?
February 16, 2011 — Worth a Thousand Words, Issue #010
December 15, 2010 — Worth a Thousand Words, Issue #008 — 3 Tips for Better Holiday Photos
November 15, 2010 — Worth a Thousand Words, Issue #007 — Using Your Wide Angle Lens and much more
October 20, 2010 — Worth a Thousand Words, Issue #006 — Perk Up Your People Pictures
September 15, 2010 — Worth a Thousand Words, Issue #005 — Interview with Tony Sweet
August 18, 2010 — Worth a Thousand Words, Issue #004 — Tips for Better Summer Photography
May 17, 2010 — Worth a Thousand Words, Issue #001 — The real secret to creativity
On the third Wednesday of each month you will receive the latest issue of "Worth a Thousand Words."
Subscribe NOW to receive your free download in pdf format.
Here you will find a collection of tips to learn basic photography information, and prepare you for great shooting. Read this before you head out with your camera! From magic light to ridding yourself of preconceived ideas, learn about it here.
The "golden hour" is known by some photographers as the "magic hour," or a time of "magic light." It occurs (roughly) during the hour before and after sunrise or sunset. This is the best time to be shooting outside. Why?
During the golden hour, the sun’s rays hit the earth at a lower angle. This makes the light softer (more diffuse), and warmer in hue, and the shadows longer. All in all, that makes for better photography.
Consider the following two images that were shot in the morning, only a few hours apart. I took both from almost the same camera position (the camera is shifted slightly to the right for the second image). I took the first image during magic hour at 5:20am, and I took the second only 3 hours later at 8:30am, after the sun was high in the sky. Notice how much warmer the light in the first image is; we see lovely orange tones.

Landscape shot at 5:20am, during golden hour.
© Julie Waterhouse Photography

Same landscape shot at 8:30am, after the sun was high in the sky.
© Julie Waterhouse Photography
What a difference the light makes! It’s definitely worth getting up in the morning.
Ready to learn basic photography information? Read on!
Always carry your camera! Sounds silly to say, but it’s an essential ingredient of any great shot. If you have no camera, you have no shot at all!
You may not think of your state of mind as "basic photography information," but I think it’s crucial to taking great pictures.
All too often, we photographers get a preconceived notion about what we’re going to shoot that day. We decide that today is the day for us to shoot horses. Worse, we see a particular image in our minds ("I want to shoot a red barn against a blue sky, with some horses roaming in the front"). When we do that, we can spend the day driving around the countryside "looking" for that image, which may prove to be elusive (all the horses are in the barn that day!). End result? We’ve wasted the day.
Instead, be flexible. Sure, drive out into the countryside! But be open to what you find there. One of the best pieces of photographic advice I’ve received was at a talk by National Geographic photographer, Steve McCurry. Paraphrased in my own words, it was:
Look for where the great light is. What’s in that light? Shoot that!
On the other hand, as well as being flexible, you must still be prepared. There’s always a balance between being open to what you find, and being prepared. Here’s another favorite quote of mine:
"Luck is what happens when preparation meets opportunity."
–Seneca
So, have your gear ready, expect the unexpected, and take what you find!
State of mind is important, and patience is key. Landscape photographers must be patient enough to wait for the right light. Portrait photographers must be patient enough to wait for the right expression. Product and macro photographers who work in a studio have control over their subject and lighting, but must still have the patience to fine-tune their images.
Have the patience to persist until you get it right, and until you find that "wow" image. When you think you’ve taken all the images possible of a scene, you are often just getting started. Push through the block of thinking there’s nothing left, and keep shooting. You may surprise yourself with the results!
My number one rule (okay, one of them!) is to shoot what you’re passionate about. If you’re not reacting emotionally to your subject matter, then surely the viewer of your image won’t either. If you’re not feeling excited (or stimulated by some strong emotion) when you look through the viewfinder, then don’t press the shutter button! Don’t you have enough ho-hum images clogging up your hard drive already?
Keep reading to learn basic photography information!
I know, I know! This seems like truly "basic photography information!" No one likes to read the manual! You just want to get out there and start shooting. Well, can we compromise? Read enough of the manual so that you know how to perform the basic operations with your camera that you’ll need in the field.
If you are just starting out, make sure you know how to choose your shooting "mode" (portrait? landscape?). Make sure you have chosen RAW vs JPEG for your images, as appropriate for your needs. Make sure you know how to view the image you’ve just taken. Be able to use your zoom.
Once you get a little further along, learn how to change your ISO, aperture and shutter speed, and make sure that you know how to display your histogram.
The worst thing to have happen is to see a great shot, and miss it because you’re too busy fumbling around with your camera settings!
Insurance also falls into the category of very "basic" photography information, but it shouldn’t be overlooked. The cost of camera equipment adds up faster than you think. If you are an amateur photographer, you can insure your equipment through your home insurance policy. Call your broker, and have them set up a rider on your policy. It will cost you a few extra dollars a year, but be well worth it if you have an accident! Make sure you itemize each piece of equipment (lenses, bodies, printers, tripod — anything expensive!) and include the serial number and replacement cost.
Next, you might want to read about Exposure Basics.
Want to learn how to photograph children so they look real and natural, and not like that posed department store children portrait photography? Our special guest writer Barbara Bender, a professional freelance photographer and writer, shares the tips she uses when doing child portrait photography of her grandchildren.

How to photograph children
© Barbara Bender
This article is not about making formal portraits of well behaved, dressed up little children who are smiling nicely for the camera. It’s about shooting kids as they really are… messy, adorable, active, silly-acting little people who can laugh with joy one minute and have a tantrum the next. Their emotions are extravagant and their faces and body language reflect them clearly. These feelings can dramatically change within seconds. When I photograph my seven grandchildren. I like to capture the unabashed laughter, the silliness, the tears and all the other precious, fleeting moments of their childhood. I want to photograph them as they are in that moment, not make them act out a role that I have determined for them.
This kind of child portrait photography is noisy, unpredictable, exhausting and exhilarating. In order to capture the true essence of kids and portray the ups and downs of childhood you must have your camera ready at every moment, and work with each situation as it quickly arises. You need to accept the fact that your image quality may not live up to your usual photographic standards. The use of a higher ISO, necessary to "freeze" swiftly moving kids, can result in digital noise. There may be some camera shake or unintentional motion blur. Backgrounds might be messy, and the light not always ideal. Because you only have seconds to shoot, your compositions can sometimes be awkward. However, if you embrace the chaos and relax with the fact that there may be some technical flaws in many of your images, and if your image is honest and evocative, you will have created a successful photograph.

Children portrait photography
© Barbara Bender
Advanced planning is essential in child portrait photography. Very few kids will wait patiently while you switch lenses, adjust settings, or change batteries or memory cards. They are too busy, and if you’re involved doing camera stuff, you will miss the shot. Come to the shoot with freshly charged batteries and several large capacity memory cards. A zoom lens which covers a good span of focal lengths is very useful. Although it offends my artistic sensibilities to have no control over my depth of field, I often shoot in Program mode when photographing the little ones at times when things are happening at warp speed. I set my ISO to 500 or 1000, depending on the light, even though I know that there will be some digital noise. I’d rather capture the moment and the expression, than risk missing it while I fiddle with camera controls. Since action happens quickly and unexpectedly around kids, I set my camera on the continuous shooting mode and often keep shooting even after I think the moment has passed. Frequently the seconds following the "main event" can hold interesting possibilities.
Barbara shares her thoughts on
how to photograph children…
"Advanced planning is essential…"
It is very difficult to capture the personality of very young babies in still photographs, but once they reach several months of age, their characters have begun to emerge, and photographing them becomes easier and more fun. There are countless opportunities for photos as babies begin to sit, crawl, walk and play. Bath times and mealtimes are also full of photographic potential. Just be there and ready, and capture the spontaneous moments as they occur, without any specific agenda in mind.
Toddlers

Children portrait photography
© Barbara Bender
Toddlers are loveable, impossible, stubborn, full of energy and usually have minds of their own. Good luck trying to get them to cooperate. One minute they are full of giggles; the next in a flood of tears. Follow their lead, accept them for themselves and enjoy the moment. They are busy little people, with many interests, and you can follow them around and photograph all of it. Don’t forget, they’re small, so get down to their level for better pictures.
Preschoolers
By three or four, kids have settled down somewhat and can usually communicate very well. They may follow your instructions… for about two minutes… then will want to direct the shoot themselves. Ask them what they would like to be doing in their pictures.
Around this time, kids often become self conscious and can’t figure out how to smile naturally. Because they often love to make silly faces and rude noises, use this to your advantage, and ask them to show you their repertoire of goofy expressions and poses. They’ll have a blast and as they laugh in a genuine way at their own cleverness, you can often capture that.

Children portrait photography
© Barbara Bender
They’re bigger and want to appear mature, but they’re still kids, and most love to horse around and be silly. Again, photograph them doing what they enjoy doing, and let them tell you what that is. When children are engrossed in an activity, their facial expressions and body language are genuine and natural and the pictures will be more evocative and will reveal their personalities.

Children portrait photography
© Barbara Bender
So, embrace the chaos of children portrait photography! Have your camera with you, set up and ready to shoot, and be prepared for whatever happens. Take advantage of the moments and opportunities as they arise, but don’t forget to join in the fun and enjoy yourself.
Tip:
BetterPhoto.com teaches online photography courses on a whole variety of subjects. I’ve taken three of them myself, and highly recommend the company. They have a 4-week course called "Photographing Children and Babies" that teaches more great tips for photographing kids, to add to what you’ve learned from Barbara. Secure Your Seat TODAY!
~Julie

Children portrait photography
© Barbara Bender

Barbara Bender is a freelance professional photographer and writer who uses various creative techniques, emphasis on design, and simple, often graphic composition to make photographs which are frequently expressive in nature. Her photographs have been featured in such publications as Nature’s Best Awards Issue, Black and White Magazine, and Color Magazine. A series of articles on photographic Creativity and Playfulness was featured in PhotoLife Magazine in 2010. Over forty-five of her images have been used as book covers for Guernica Editions. As an active member of the Greater Toronto Council of Camera Clubs, she gives presentations and workshops on various photographic topics.
Next, you may want to read some portrait photography tips.
Improve your close up photography with these downloadable PDF eBooks. In these books, I share my passion for, and extensive experience with, macro photography. The books are written to be clear and easy to understand, and are filled with spectacular, full color images to stimulate your creativity.

Buy Creative Closeup Photography and Creative Closeup Photography II together, and get a special price! Only $12 for both!
I have been speaking and giving workshops on close up photography for years, and finally decided it was time to put pen to paper (well, fingers to keyboard, anyway!) to share my experience and love of macro photography with you.
Have you ever struggled to get the close up images you want? Close up photography differs from traditional photography in a number of key ways. Through my workshops, I’ve seen people struggle because they are not expecting these differences, and are unsure how to handle them, or unaware of them altogether. In these eBooks, I attempt to unlock the mysteries of the macro world, with clear descriptions and illustrative images. No more wondering how it’s done! I’ll share expert macro photography tips and tricks that will fix the problems you’ve been experiencing.
Do you want to take better closeup photographs? I want to help you to start taking pictures that will give you a sense of pride and accomplishment; pictures that will "wow" your friends, and that you’d be happy to hang on your wall. Learn from the informative content in these eBooks, and be inspired by the beautiful and creative images.


What’s Inside?
Creative Closeup Photography is a 60-page, downloadable PDF eBook full of helpful tips, useful information, and spectacular, full color images to inspire you to create better close up photographs.
Equipment
I talk about all the basic equipment involved in close up photography, from lenses to extension tubes to diopters.
Depth of Field
One of the biggest challenges of close up photography is having extremely limited depth of field. I discuss depth of field in detail, including how to select the aperture appropriate to the situation.
Composition
Just because you’re close up doesn’t mean you can forget the rules of composition! I also discuss background choice, and the necessity of eliminating distractions.
And More!
I include some nuggets on lighting, working with nature, and overall workflow.
ONLY $8 Buy now:
![]()
![]()
Buy together with Creative Closeup Photography II and S A V E! Only $12 for both. Buy now:
![]()
![]()
If you don’t have a PayPal account, don’t worry! The PayPal checkout interface gives you the option to pay by credit card, even if you don’t have a PayPal account.
After you’ve paid for the eBook, the PayPal checkout interface will display a "Click here to download…" link to download the your copy of the book.


What’s Inside?
Creative Closeup Photography II is a 58-page, downloadable PDF eBook full of helpful tips, useful information, and spectacular, full color images to inspire you to create better close up photographs. It is the perfect companion to the first Creative Closeup Photography eBook
What’s the Difference?
I examine some of the key differences between closeup and traditional photography so that you can start using them to your advantage.
Focusing
I provide some tips to help with the tricky task of focusing close up. I also provide extensive discussion on the technique of selective focus, which you can use to create artistic, painterly images.
Advanced Equipment
I de-mystify focusing rails, bellows, stacking lenses, right angle viewfinder attachments, and the Lensbaby™.
Camera Features
Your camera may have some useful features that can help with your macro photography: mirror lockup, and depth of field preview.
Controlling Light
This is where’s where the magic happens! I provide comprehensive information about reflectors and diffusers, including how to make your own at almost no cost.
Workflow
I reveal the start to finish process that I
use when photographing closeups.
ONLY $8 Buy now:
![]()
![]()
Buy together with Creative Closeup Photography and S A V E! Only $12 for both.
![]()
![]()
If you don’t have a PayPal account, don’t worry! The PayPal checkout interface gives you the option to pay by credit card, even if you don’t have a PayPal account.
After you’ve paid for the eBook, the PayPal checkout interface will display a "Click here to download…" link to download the your copy of the book.
Is “calibrate monitor” on your todo list? If not, you are missing an essential step in your photo processing workflow. I will go so far as to say that if you are editing your images after you take them, and your monitor is not calibrated, then you are wasting your time!
If you’re not sure what monitor calibration means, why it’s important, or how to go about it, then this page is for you.
To calibrate a monitor means to adjust its color, brightness and contrast settings so that its color output matches a standard.
Printer Test Image
(source of original: www.digitaldog.net)
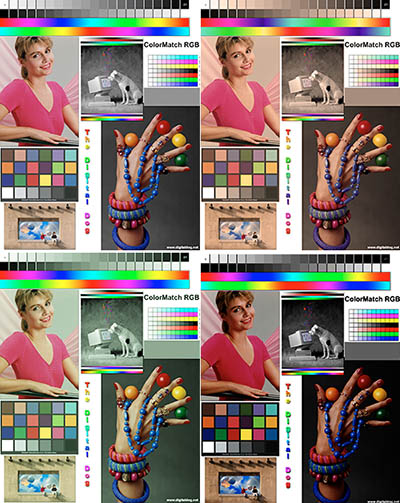
Which one of the above images is “correct?” Unless you are looking at this on a calibrated monitor, I’m not even sure what you’ll see. On my calibrated monitor, the top left image is the color correct one. The top right has a warm cast, and the bottom left has a green cast. The bottom right is too dark. If your monitor is not calibrated, your may see something quite different.
Color calibration is critical so that you and I see the same image when we look at our monitors. As long as your viewer is using a calibrated monitor, they should see the same colors that you do when you create your images for the web.
Color calibration is also critical so that your photographic prints look like what you see on your monitor. There are many steps in producing a perfect print, but a key one in a color managed workflow is monitor calibration. Imaging if you don’t calibrate your monitor. You spend minutes or even hours tweaking your images in a RAW processor like Adobe Lightroom or Photoshop to get exactly what you want on the screen. Perfect! Now you print the photograph, or perhaps post it to your website. Someone else comes along who has a calibrated system, and they may see an image with a green cast, or one that’s too dark. That’s because your monitor colors were off when you created the image. So, you have wasted your precious time.
To properly calibrate a monitor, you need a device called a colorimeter, and some software. The colorimeter is a physical device that you place on your monitor. The software that comes with it will display shades or red, green, blue, and grey on your monitor, while the device reads the color values. It will use a software algorithm to create a color profile of your monitor. This profile stores the proper color settings for your monitor so that they match a universal standard, and the profile is loaded whenever you start your computer.
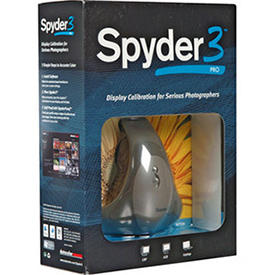
Spyder Calibration from Datacolor
There are a number of different products on the market that calibrate monitors. They range in price anywhere from about $100 to $3000 USD. This is one item that is worth investing in, but you don’t need to go crazy. You can get a good product for the bottom price in the range. The one I use and recommend is Spyder3 from Datacolor. I have used Spyder calibration with both a PC and a Mac, and with both a CRT display and an LCD. It works like a charm, is straightforward to use, and has given me excellent results when used in my printing workflow. It’s also reasonably priced, at under USD$150.
Whatever product you choose, make sure it works on your operating system, and make sure it works for the type of display you want to calibrate: a CRT, an LCD, a laptop, or a projector.
Your calibration software will likely remind you when it’s time to recalibrate. About once a month is probably reasonable. LCD monitors are a little more stable than CRT’s so may need calibrating less often, but why take a chance? Color calibration is so critical, that I would make the process part of your regular routine. It only takes a few minutes.
You should warm up your monitor for an hour before calibrating.
Plug in the colorimeter device for about 5 minutes before using
it, to let it warm up too.
Turn your screen saver and other power saving features off during calibration. You don’t want your monitor to go dark part-way through the process, or you’ll have to start over again!
Calibrate in a darkened room, in the light under which you normally edit your photographs. Make sure you have no external lights falling on the screen. I even go so far as to make sure I’m wearing neutral clothing (no bright red sweater!) if I will be sitting in front of the monitor during calibration to avoid unwanted reflections of color on the screen.
If you use a laptop with an external monitor, make sure you are creating a profile for the correct screen.
If you have an older version of a color calibration product, make sure you download the latest software driver from the Datacolor website if you want to install it on a newer version of your O/S.

Check out these
monitor calibration
tools from B&H
Now you are ready to check “calibrate monitor” off your todo list! Next you may want to learn about the rest of the digital photo workflow.
Here are some hints and tips so that you can create digital photo books that wow! Find inspiring topic ideas, and learn how to choose the right images, lay them out on the page, and more.
First and foremost, creating your own photo books is fun! It’s exciting to go through your images to choose favorites, and extraordinarily satisfying to see them come together in a professional-looking finished product. To me, a photograph is not a final product until it is in printed form.
In the digital age, we tend to take lots (and lots!) of pictures, but print very few.
Photos get lost and forgotten, languishing on your hard drive. Digital photography books are a great way to resurrect the old photo albums but with a modern and more sophisticated twist.
Photo books are a great way to show off your images to family and friends that they will enjoy much more than sitting though a long slideshow in your laptop! Creating a book forces you to cull your collection, choosing only the best of the best, and presenting them nicely in a portable, easy to handle way. This will definitely please your audience!
Another advantage of photo books is that you can make several copies to share with family and friends!

There are endless possibilities for subjects for your digital photo books. What will make your book stand out, however, is giving it a coherent theme, rather than making it a random collection of pictures. A good photo book does more than present images; it tells a story. Try to find a thread that you can weave through the book so that the pictures relate to one another.
Here are a few ideas for themes for your digital photography books.
The most important factor in making your digital photo books look great is selecting your best photos. That may sound obvious, but it’s not always easy to do. One of the hallmarks of a great photographer is being able to edit your work. You need to be really tough on yourself. It can be difficult to separate the emotion you felt in the moment of taking the photograph with how successful the resulting photograph actually is. Sometimes, it helps to choose a few images, and then walk away and come back later with a fresh perspective. Edit, edit, edit. Keep on brutally narrowing it down until you’re left with the cream of the crop.
Remember how we said that a good photo book tells a story? An effective way to do that is by selecting a mix of overview pictures, medium close-ups, and close-ups. In a good story, you first set the scene with an overview image, then you move in closer to describe more of the "plot," and finally, you include some interesting details that people might otherwise overlook. In your digital photo books, you might have a single progression from overview to details, or you may move through that pattern rhythmically a few times.
If there is a chronology or an evolution to the images, make sure you include them in that order.
And did I mention? Be a brutal editor!
Once you’ve chosen your images, you need to lay them out on a page. Most of the companies that produce digital photo books provide tools and templates to help you choose themes, page styles, and background colors to achieve a polished look.
You may want to have a very simple layout with a single image on each page. Especially if you are creating a fine art photo book, a simple layout keeps the attention on the pictures. You want people to be looking at your photographs, not the embellishments on the page.
On the other hand, stories can work well with groupings of images, and a less formal layout and background style can add fun to a memory book.
When you are selecting which pictures to place together, choose colors that complement one another. If the colors are similar, you will achieve a more soothing and harmonious look. If they are opposites, you will generate energy. What works best depends a bit on your story; just make sure to give it some consideration.

© Julie Waterhouse Photography
An example 2-page spread from my book of quotations.
I paired a close-up with a medium distance shot, and
selected images with the same color palette.
Also, don’t forget that when you open a book, you see the left and right pages at the same time, so make sure that the photos on both sides flow together well.
Finally, you may want to add text to your photos in the form of captions or descriptions. If you do so, I recommend
keeping the font consistent throughout the book for a more unified and polished look.
Not all applications for making digital photography books allow you control of how your image gets cropped when you place it within a template. Make sure that if you are not designing your own pages from scratch using an application like Adobe Photoshop or In Design, that you choose your images carefully to match the available space. Think about whether a photo in portrait or landscape orientation will work best, and pay attention to what, if any, parts of the image are cut off. Some photo book applications allow you to move the image around within the frame window.
Consider whether you will create your digital photo books in portrait or landscape orientation. Landscape seems to be more common, but portrait has its advantages. You can place a landscape image into a portrait-oriented book as a full two-page spread.
Is "calibrate monitor" a regular on your todo list? If you are not working in a color managed environment, keep in mind that what you see on your monitor may not be what you get when you print your photo book. If you don’t want to bother with calibration, then you’re probably best off to err on the side of making your images look a little brighter, since they often tend to print darker.
If you are working in a color managed environment, then see whether the publisher/printer for the digital photo books provides a color (ICC) profile that you can download and use to soft proof your book.
1. To avoid working online, which can be slow depending on the speed of your connection, many digital photo book companies allow to download their software and create the book offline, on your own computer. You can then upload the finished product.
2. Edit your photos in your own software (such as Lightroom, Photoshop, or Aperture) before including them in your book since most book production software is fairly limited in terms of photo editing. If you do this, then also remember to turn off any image auto correction settings in the book-making software.
3. To get an idea of what works in terms of layouts, check out other people’s books. Learn by seeing what works, and what doesn’t. You can find examples online at many of the companies that produce digital photo books.
4. Share a draft of your digital photo books with a trusted friend or three before you publish it to get some constructive feedback. It’s much less costly to fix things before you’ve sent a batch to be printed!
5. A somewhat sneaky way to get a discount on your digital photo books is to download the book-making software, and then wait some time before you send a book to print. Not always, but quite often the company will send you a discount coupon to encourage you to complete your book.
6. Creating a photo book is an excellent learning exercise for any photographer. After you create your books, you will revisit them many times, and you’ll continue to learn and improve with each new one.
***C2_invitation_27358957***
Looking for some creative photo ideas, and ways to boost your photographic creativity? This page contains a handful of creative photography exercises to flex your creative muscle and stimulate your imagination. They’re not meant to be easy. They are meant to push you.
Creativity. It’s that elusive "something extra" that takes a photograph from "okay" to "wow!" You can master the technical aspects of photography, but without a creative spark, your images won’t get a second look. Creativity can’t be explicitly taught, but it can be encouraged and stimulated.
Many years ago, I was photographing a canola field with my friend. We were out there for a few hours. When I finally came up for air, I felt like I had taken every conceivable photograph of that canola field!

A rather conventional image of a canola field
© Julie Waterhouse Photography
I looked around. My friend was still "in the zone," and I didn’t want to disturb him. What to do? I really felt like I had exhausted all my photographic opportunities. "What the heck," I thought to myself, "I’ll just mess around and have some fun for a while…" Bing! (That’s the sound of a light bulb going off, as my attitude suddenly shifted from "work mode" to "play mode.") I took my camera off the tripod (can you hear another Bing!?) and started to wander around.
The next thing I knew, I had walked into the field a few rows, and was lying on my back shooting up into the sky, with some bits of canola so close to the lens, they weren’t in focus. Which photos do you think were my favorites of the day?

“Creative” canola
© Julie Waterhouse Photography
That day, I learned that, at least for me, I often have to shoot my way through all the "expected" and conventional photographs first. When I’ve exhausted those, the trick is to push myself and keep shooting. After all, what’s left after you’ve taken "every" shot? That’s right! You have to get creative at that point to make any more images.
No matter how creative you think you are, if you keep shooting after you believe you’ve exhausted all the possibilities, then you have to be shooting something that’s new – at least to you!
So – my advice to you? When you think you’ve finished shooting, you’ve only just begun. Keep going! You might just surprise yourself with the results.
Here are a few creative photo ideas to get your juices flowing…
Restrict yourself to 1 lens, and go out and shoot for a morning (or an afternoon, or some suitably long period of time). Pick the lens you like or use the least. This is supposed to take you out of your comfort zone, right?
For an added challenge, restrict yourself to a single aperture. If you like to shoot wide open, use f/22. If you are addicted to details, it’s f/2.8 for you!
No, you don’t have to hold your camera steady while hula-hooping (is that a verb?)! The idea is to toss a hula hoop randomly outside your house. Now make 20 images while standing within the hoop.
As a variation, try making 20 images of what’s inside the hula hoop (a macro lens may be helpful here!)
Have a friend (not you!) choose 3 seemingly unrelated objects. You must then photograph them together. Push yourself! Make at least 5 different compositions, and get those creative photo ideas flowing!

In the bathroom
© Julie Waterhouse Photography
The bathroom? Yes! It’s one of the last places you’d think of to take your camera. So, get in there and start shooting! (Maybe wait until it’s unoccupied, first!) Shoot at least 10 images.
All too often, people shoot photographs of pets (and children, for that matter) from their own eye level. It’s much better to get down to the level of your subject to shoot a nice portrait.
In this exercise, we’ll try to spark some creative photo ideas by turning things around. Pretend that you are the pet. How would you see the world if you were a dog? A hamster? Shoot 20 images from the perspective of your pet’s eye level. (So sorry if you happen to have a pet snake! Better get down on your tummy! 🙂 )
Connecting with your viewer is all about conveying how you feel about your subject through the photograph. Try to shoot a series of 10 images that express a particular emotion: joy, sadness, hope, … Warning: this one is not easy! Think about how you will represent the emotion. Literally? Symbolically? Streeeeeeetch!

© Julie Waterhouse Photography
You might also be interested in these other creative photo ideas:
Creative Photo Ideas: Part I – Fun with Foil and Food Coloring
Creative Photo Ideas: Part III – Flowers Through Waterglass