Fun With Foil & Food Coloring
Creative Photo Ideas:
Fun with Foil and Food Coloring
Tip
If you don’t have a macro lens, you can use extension tubes on a long lens, or a close-up filter. The trick is to be able to focus close to your subject.
Ready to make some creative, abstract photographs? Then let’s get started!
Warning: None of these exercises is easy! They all soundeasy, but in fact, they take practice. You will throw away far more images than you keep. My advice is to always, always keep it simple. Use one, or at most two, colors in an image, and try to compose with only one or two lines or simple shapes. Less is definitely more with these kinds of images!
Creative Photo Ideas #1:
Colored Water Reflected in Foil
What you’ll need
1. Aluminum foil or silver mylar. I much prefer the smooth surface of silver mylar to the way the foil gets crinkled. It’s personal taste. Experiment with both and see what you like. You can pick up the silver mylar at most craft stores. Some Christmas wrapping paper has the same shiny surface on the back side. It should bend, not crease, when you “wrinkle” it up.
2. Weights (any small objects work — grab some small stones from the garden!) to hold the foil or mylar in the position you want.
3. Glasses or vases filled with water.
4. Food coloring. A few drops of your favorite food coloring dropped into the glass of water. I find one glass (i.e., one color) works best. I recommend at most two, or else the images get too busy.
5. A tripod. You need to make ultra-fine adjustments to your composition. Hand-holding your camera would be an exercise in frustration!
Directions
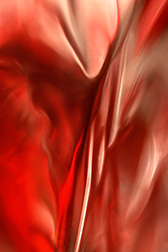
Colored water reflected in silver mylar
© Julie Waterhouse Photography
Find yourself a table near some good window light.
Lay out the sheet of foil or silver mylar on the table. Be careful not to get dust or fingerprints on the mylar, as they will show up in your photos!
Wrinkle the mylar a little until some lines are created in the form of ripples (mylar) or creases (foil). Hold it in position with your weights.
Place the glass(es) of colored water on, or next to, the foil. The idea is to shoot down into the mylar. Don’t shoot the glasses of water; they are just meant to be reflected in the silver, adding color.
Now comes the tricky part: finding a good composition. The first thing you will notice is that any slight adjustment in your camera position, or in the position of the mylar, will radically alter the image. You must work carefully. I tend to work by scanning the mylar for any promising wrinkles or ripples. I then position my lens over the area (my camera is usually only a few inches away when I use my macro lens). Finally, I fine tune my composition by either moving the weights to change the ripple, or moving my camera.
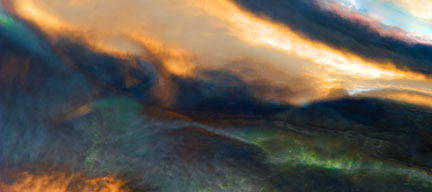
Colored water reflected in silver mylar
© Julie Waterhouse Photography
Experiment! Be prepared to get frustrated. This is not easy. Just be glad we have digital! In the days of film, this would be an expensive exercise! And remember, less is more. Keep it simple.
Ready for more creative photo ideas? Read on!
Creative Photo Ideas #2: Food-coloring in Water
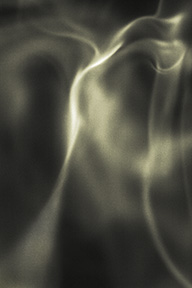
Food coloring dropped into water.
(No, it’s not smoke!)
© Julie Waterhouse Photography
What you’ll need
1. A large, flat-sided glass vase (a small fish tank would work too). You need a clear container that will hold water. You want a flat surface to shoot through to eliminate reflections.
2. A while wall or backdrop. You want a white background behind the vase so you have a nice neutral, but bright, background against which to shoot.
3. Food coloring. A few drops of your favorite food coloring dropped into the glass of water. Timing is everything! Don’t add the food coloring until you’re ready to shoot.
4. A pencil. I hold this in the water, in the center of the vase, as I’m setting up. It allows me to pre-focus my lens before I drop in the food coloring.
5. A cable release (or an assistant!) and tripod. The cable release allows me to shoot as I drop the water into the vase. An assistant can help here too! Have a friend drop the water in for you when you are ready to shoot (you’ll need a patient friend, as you’ll likely want to try this a few times!).
Directions
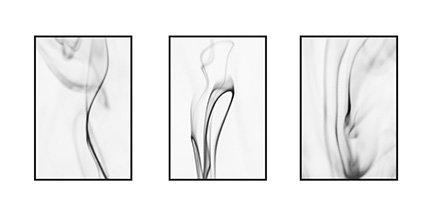
Blue food coloring dropped into water,
and then the final image inverted.
© Julie Waterhouse Photography
Find yourself a table near some good window light.
Shoot against a white wall, or place a white backdrop behind your set-up.
Place the vase of water on the table, and line up your camera so that your field of view covers only the center of the vase (you don’t want to see the edges). For now, you should see all white.
This is the time to hold a pencil, or other object, in the water, where the food coloring will fall. Set your camera on manual focus, and focus on the pencil.
Use as fast a shutter speed as the lighting allows. Otherwise, you will get blurry-looking images. It’s hard enough to get a sharp image of liquid, without movement in the mix!
Tip
I tend to find that cold water works better than warm: the food coloring dissipates more slowly
When you’re ready, drop in one to three (experiment!) drops of food coloring, and start shooting. Try to focus on a simple line or shape. You need to shoot quickly before the food coloring dissipates. Once it does, dump it out and start again!
Ready for yet more creative photo ideas? Read on!
Creative Photo Ideas #3: Textured Glass
What you’ll need
1. Glasses or vases of water. Again, less is more. One or two glasses (i.e., colors) should be sufficient.
2. Food coloring. A few drops of your favorite food coloring dropped into the glass of water.
3. A piece of textured glass. [optional — see the variation] I found sheet about 1′ x 2′ at my local stained glass store. They carry clear glass in all different textures: bubbles, crackles, ripples, and more. Get a few pieces to experiment with. They are not very expensive (a few dollars each).
4. A macro lens, or other means of focusing close up.
Directions
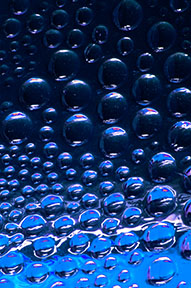
Colored water through textured glass.
© Julie Waterhouse Photography
Find yourself a table near some good window light.
Add the food coloring to your glass of water.
Lean the piece of textured glass against the glass of water (or use another means of propping it up in front of the water glasses). If the glasses are full of water, they should be heavy enough to support the textured glass pieces.
Focus on the textured glass. The glasses of colored water behind are simply there to add color. You can experiment with focusing extremely close to get some simple, abstract shapes, or further away, as in the picture on the right, to capture the texture.
You can place two glasses side by side, with the sheet of textured glass covering both, to add two colors to the mix. Reminder: less is more! Keep it simple.
As a variation, eliminate the textured glass altogether, and shoot the glasses of water. Get in close and shoot the edges of the glasses or vases. Stack a few side-by-side, and shoot the overlaps.
You might also be interested in these other creativity exercises:
If you are interested in more creative photo ideas, try Creative Photo Ideas: Part II (a set of fun exercises to stretch your imagination), or Creative Photo Ideas: Part III(shooting flowers through waterglass).