An Unusual Twist on Flower Photography
Looking for unusual and creative photo ideas to provide a twist for your flower photography? I have just the thing to give a beautiful, dream-like look to your images. You’ll need a macro or a long lens, a piece of waterglass, and of course some flowers. All that’s left to bring is your imagination!
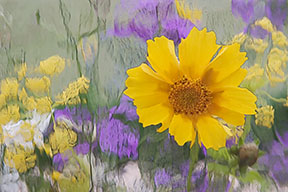
Flowers photographed through waterglass.
© Julie Waterhouse Photography
What You’ll Need
Tip
Protect your fingers by using masking tape to tape around the edges of the glass, as it can be sharp.
1. A piece of waterglass. I’m not referring to the jelly-like compound of sodium silicate. By "waterglass," I mean a piece of glass with a surface texture created by stretching the hot glass sheet while it is still in a pliable state. The result resembles the waves on the surface of a lake or stream. You can purchase sheets of waterglass inexpensively at most stained glass supply stores.
2. Waterglass holder. You need something to prop up the waterglass. You may want to start with something simple, like a styrofoam block into which you cut a groove to hold the glass upright. If you decide that this is something you want to do more often, you may decide to invest the time to create a wooden glass holder that you can mount on a second tripod. See below for instructions.
3. Flowers! You can use flowers growing in the wild, or a pot on your deck, or a vase on your kitchen table. The choice is yours!
Making your own Wooden Glass Holder
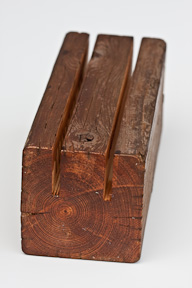
Wooden glass holder – side view
© Julie Waterhouse Photography
I used an off-cut from a 4×4.
Use a table saw, or carefully make multiple passes with a skill saw, to cut two grooves in the wood. They should be slightly wider than your glass so that the glass will go in and out easily, but be held upright. I used two grooves instead of just one so that I have the option of stacking two different textures of glass.
The wood block can be placed on a table, but it’s much more flexible if you enhance it so that it can be attached to a spare tripod.
To do that, I drilled out a hole on the bottom of the block, and glued in a nut that would fit the screw of my tripod head attachment. This screw is a standard size. You need to remove your tripod head, and find the base. It will have a screw that is used to attach your tripod head. Instead you’ll attach the block of wood.
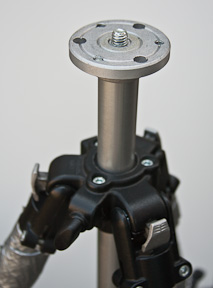 Tripod head attachment. © Julie Waterhouse Photography |
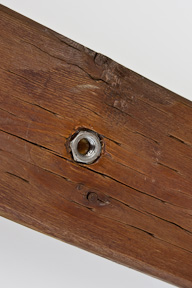 Wooden glass holder – bottom view © Julie Waterhouse Photography |
You need to remove your tripod head, and find the base. It will have a screw that is used to attach your tripod head. Instead you’ll attach the block of wood.
Getting Set Up
When you set up to shoot, you’ll want to place the tripod holding the waterglass close to your subject, and then the tripod with your camera close behind it.
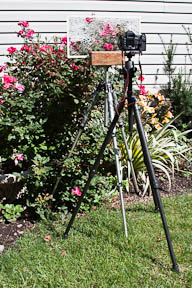 Waterglass shooting setup. © Julie Waterhouse Photography |
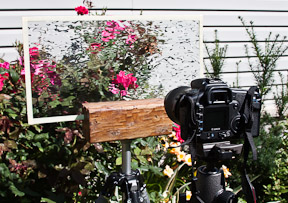 Waterglass shooting setup. © Julie Waterhouse Photography |
Helpful Hints
Tip
I find it works best to have at least one flower touching or almost touching the glass. That flower will be fairly sharp and clear, and creates a focal point in the image.
When you are just starting out with this technique, it’s easy to be distracted by the effect of the waterglass. Remember, when you are arranging your composition, the same rules apply as always. You still need a strong and effective composition; the waterglass effect will not "carry" the image.
The closer the flowers are to the waterglass, the less "warped" they will appear. I find compositions work best that include one flower, or a group of flowers that are clear, along with a background of more warped and impressionistic flowers. That means having one or more flowers close to the glass, and then a few further away. Having at least one flower clear helps the viewer to understand what the image is about, and renders it less of an abstract.
Note that I sometimes post-process my waterglass images in Photoshop to add a bit of the Poster Edges filter – don’t overdo it! This is not necessary, but can sometimes add a bit of punch to the image.
Experiment, and have fun! Warning: this can keep you busy for hours!
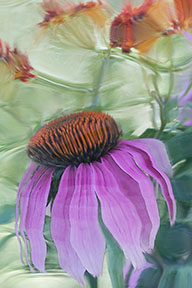
Flowers through waterglass – an example.
© Julie Waterhouse Photography
If you are interested in more creative photo ideas, check out Creative Photo Ideas: Part 1 – Fun with Foil and Food Coloring (a set-up for close-up abstract shooting), or Creative Photo Ideas: Part II – Exercises (a set of exercises designed to stretch you imagination).
You might also be interested in these other creativity exercises:
Creative Photo Ideas: Exercises
Creative Photo Ideas: Fun with Foil and Food Coloring