Basic Photography Information
Here you will find a collection of tips to learn basic photography information, and prepare you for great shooting. Read this before you head out with your camera! From magic light to ridding yourself of preconceived ideas, learn about it here.
Contents:
The Golden Hour
The "golden hour" is known by some photographers as the "magic hour," or a time of "magic light." It occurs (roughly) during the hour before and after sunrise or sunset. This is the best time to be shooting outside. Why?
During the golden hour, the sun’s rays hit the earth at a lower angle. This makes the light softer (more diffuse), and warmer in hue, and the shadows longer. All in all, that makes for better photography.
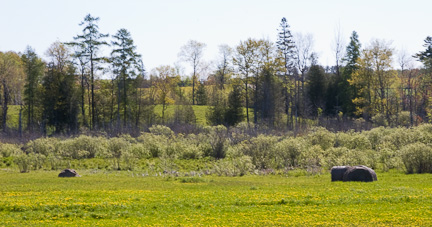
Consider the following two images that were shot in the morning, only a few hours apart. I took both from almost the same camera position (the camera is shifted slightly to the right for the second image). I took the first image during magic hour at 5:20am, and I took the second only 3 hours later at 8:30am, after the sun was high in the sky. Notice how much warmer the light in the first image is; we see lovely orange tones.

Landscape shot at 5:20am, during golden hour.
© Julie Waterhouse Photography
Same landscape shot at 8:30am, after the sun was high in the sky.
© Julie Waterhouse Photography
What a difference the light makes! It’s definitely worth getting up in the morning.
Ready to learn basic photography information? Read on!
State of Mind
Be Prepared but Flexible.
Tip
Always carry your camera! Sounds silly to say, but it’s an essential ingredient of any great shot. If you have no camera, you have no shot at all!
You may not think of your state of mind as "basic photography information," but I think it’s crucial to taking great pictures.
All too often, we photographers get a preconceived notion about what we’re going to shoot that day. We decide that today is the day for us to shoot horses. Worse, we see a particular image in our minds ("I want to shoot a red barn against a blue sky, with some horses roaming in the front"). When we do that, we can spend the day driving around the countryside "looking" for that image, which may prove to be elusive (all the horses are in the barn that day!). End result? We’ve wasted the day.
Instead, be flexible. Sure, drive out into the countryside! But be open to what you find there. One of the best pieces of photographic advice I’ve received was at a talk by National Geographic photographer, Steve McCurry. Paraphrased in my own words, it was:
Look for where the great light is. What’s in that light? Shoot that!
On the other hand, as well as being flexible, you must still be prepared. There’s always a balance between being open to what you find, and being prepared. Here’s another favorite quote of mine:
"Luck is what happens when preparation meets opportunity."
–Seneca
So, have your gear ready, expect the unexpected, and take what you find!
Be Patient
State of mind is important, and patience is key. Landscape photographers must be patient enough to wait for the right light. Portrait photographers must be patient enough to wait for the right expression. Product and macro photographers who work in a studio have control over their subject and lighting, but must still have the patience to fine-tune their images.
Have the patience to persist until you get it right, and until you find that "wow" image. When you think you’ve taken all the images possible of a scene, you are often just getting started. Push through the block of thinking there’s nothing left, and keep shooting. You may surprise yourself with the results!
Connect with Your Emotions
My number one rule (okay, one of them!) is to shoot what you’re passionate about. If you’re not reacting emotionally to your subject matter, then surely the viewer of your image won’t either. If you’re not feeling excited (or stimulated by some strong emotion) when you look through the viewfinder, then don’t press the shutter button! Don’t you have enough ho-hum images clogging up your hard drive already?
Keep reading to learn basic photography information!
Yes, Do Read the Manual!
I know, I know! This seems like truly "basic photography information!" No one likes to read the manual! You just want to get out there and start shooting. Well, can we compromise? Read enough of the manual so that you know how to perform the basic operations with your camera that you’ll need in the field.
If you are just starting out, make sure you know how to choose your shooting "mode" (portrait? landscape?). Make sure you have chosen RAW vs JPEG for your images, as appropriate for your needs. Make sure you know how to view the image you’ve just taken. Be able to use your zoom.
Once you get a little further along, learn how to change your ISO, aperture and shutter speed, and make sure that you know how to display your histogram.
The worst thing to have happen is to see a great shot, and miss it because you’re too busy fumbling around with your camera settings!
Insure Your Equipment
Insurance also falls into the category of very "basic" photography information, but it shouldn’t be overlooked. The cost of camera equipment adds up faster than you think. If you are an amateur photographer, you can insure your equipment through your home insurance policy. Call your broker, and have them set up a rider on your policy. It will cost you a few extra dollars a year, but be well worth it if you have an accident! Make sure you itemize each piece of equipment (lenses, bodies, printers, tripod — anything expensive!) and include the serial number and replacement cost.
Next, you might want to read about Exposure Basics.