Last week’s challenge topic was so popular, it was hard to come up with one for this month that would have just as wide appeal. How about "Doors and Windows?" I know that’s a subject that many photographers are draw to, myself included. There’s something appealing about that threshhold to "somewhere else." The concept of doors and windows is universal, but they have a little different flavor in different parts of the world.
Let’s see how creative you can be with this topic! Show us images where a door or window is the star of the show.
Read the rules. One entry only each month per person, please!
Enter your super-amazing photos in our photo contests. The winning image will be featured on the Ultimate Photo Tips homepage for all of the following month.
Are you guilty of ignoring your camera’s metering mode setting? Did you know that your choice can have a big impact on your final photo? Learn about the different metering modes and the results they create.
Note: The technique here is useful for those who are shooting in JPEG, and must nail their exposure in camera, since they are not editing their photos afterwards. If you are shooting in RAW, you may or may not find this technique of value. With RAW, the most important thing is to get a right-biased photo histogram by whatever means or metering mode possible.
Video Transcript
Have you ever actually changed your camera metering mode? Or are you guilty of just ignoring it? Did you know it can dramatically affect the look of your final image in certain situations? Hi, I’m Julie from Ultimate Photo Tips, and in today’s video, I’m going to explain the different metering modes, and show you how selecting different modes can impact your final photo.
A camera uses its metering system to measure the light in a scene. In automatic exposure modes, it uses those metering readings to set the aperture and shutter speed to get a correct exposure. Let’s talk about the different camera metering modes you can choose from:
First, there’s evaluative or matrix metering. This is a reasonable choice for a default mode. With this setting, the camera averages the light in the entire scene to come up with a recommended exposure. However, your camera is calibrated to measure everything under the assumption that it reflects light like an object that has a luminance of middle grey. Since the real world is actually full of objects that reflect light differently than middle gray, your camera’s meter may not always get the exposure correct using this averaging mode. That’s why the next modes I’m going to talk about can be so important.
So, next we have spot metering. Spot metering is for taking an exposure reading of a very small part of a scene. It’s weighted in the very centre of the frame, so you need to line up the subject that you want to meter with the center, and then lock your exposure (check your manual for how to lock exposure) and recompose if you need to. This spot metering mode is useful if you want to ensure that a particular spot in the photo is properly exposed.
Partial metering is similar to spot metering. It just uses a little more area around the centre to take a reading. It can be useful when the background is very bright relative to the subject, to prevent your subject from being rendered as a silhouette.
Finally, some cameras also offer centre-weighted average metering. It’s a bit like a cross between evaluative metering and partial metering. The exposure reading is weighted to bias the subject at the center, but also averaged over the entire scene.
Let’s wrap up by looking at an actual example of the same subject shot with different metering modes.
In the following example, I have a brightly lit subject against a shaded background. Here, I’ve used evaluative, or matrix camera metering to get an exposure that works to balance the highlights and shadows across the entire scene. You can see detail in the background. This was taken in aperture priority mode at f/5.6. The camera selected a shutter speed of 1/80s.
In the next photo, I’ve changed the camera metering mode to spot metering, and metered off the flower. Because the flower is very bright, this metering mode has caused the background to go black. This was also taken in aperture priority mode at f/5.6. This time, the camera selected a faster shutter speed of 1/250s.
The best way to learn how to use different camera metering modes is through practice. Dust off your camera manual to find out how to change modes, and how to use exposure lock, and then try a few shots with the same subject, and different modes. You will gain a whole new level of creative control over your images.
That’s it for today! If you enjoyed this video, please join me over on ultimate-photo-tips.com for more great photo tips, and make sure to sign up for my newsletter while you’re there. That’s where I share ideas and inspiration that I don’t share anywhere else.
Here are ten tips to improve your sunset photography that go BEYOND just using a tripod. If you’re not getting the results you want with your sunset photos, I can help!
Sunsets are a favorite subject among photographers! Are you getting the results you want when you shoot at sunset? Hi, I’m Julie from Ultimate Photo Tips, and today, I’m going to share 10 tips for taking better sunset photos.
Sunset photography tip #1:
Exposure. To get your exposure right, you want to expose for the sky. If you meter off the sun, everything else in the image will go too dark, and if you meter of the foreground, you’ll probably find that the sky is too bright. To make sure you have your exposure correct, trust your histogram, not your LCD. The LCD may look darker than it really is because you’re looking at the bright sun in the background.
Sunset photography tip #2:
Silhouettes. If you do expose for the sky, your foreground will likely go into silhouette. Here’s an example.
A silhouette can make a great subject. You want to look for distinctive shapes that are not too large or solid so that they don’t take over the image with a big black area.
By the way, if you don’t want your subject to be silhouetted, then you can use fill flash to add light just on the subject.
Sunset photography tip #3:
Foreground First. Get to your destination early, before the sun goes down, and scout for an interesting foreground that will make a good composition. The foreground can make or break your image. In this case, these chairs add interest to scene.
Size of the Sun. The focal length of the lens that you use will affect the size of the sun in the final image. To make the sun appear larger within the frame, use a longer lens.
In this image, the sun appears quite small. I’m using a wide angle lens, at a focal length of 24mm.
Graduated ND filter. If you are including both sky and foreground in your shot at sunset, there is often a large dynamic range of tones from light to dark, and your sensor simply can’t record them all. You end up with blocked up shadows or blown out highlights. A graduated neutral density filter can help.
Sunset photography tip #6:
Look behind you. This might sound like an odd tip, but often while we’re watching a magnificent sunset, we forget to turn around. At sunset, the light in the opposite direction to the sun can be beautiful too. You often get gorgeous, soft, pastel skies, so look behind you!
Sunset photography tip #7:
Stay after sunset. Don’t pack up as soon as the sun goes down. The warm, gentle light that happens for the half hour or so after sunset can produce beautiful photos. Sometimes you’ll even get some great color in the clouds just after the sun sets. Stick around until the light is truly gone!
And here’s a bonus tip for you! Make sure to pack a flashlight so you can see your way out after dark!
Sunset photography tip #8:
Reflections. Look for objects that are reflecting the colors of the sunset, such as buildings or bodies of water. Including them in the photo can add extra interest, and sometimes the reflected light is strong enough to make a subject all on its own.
Here’s an example of a wave taken at sunset. The sky is not part of the image, but the warm light of sunset is creating color and interest in the wave itself.
White Balance. You may want to use a white balance setting of shade or cloudy to boost the warm colors in the image, particularly if you are shooting in JPEG and won’t be post-processing your image.
Sunset photography tip #10:
Protect Your Eyes. Remember not to look directly at the sun while you’re photographing your sunsets. That includes not looking through your lens with the sun in the frame, since the lens can magnify the light of the sun, doing even more damage to your eyes. Try using live view to compose instead.
That’s it for today! Hope you found those ideas helpful. For more great photo tips, head on over to the ultimate-photo-tips.com website, and remember to sign up for my newsletter while you’re there. That’s where I share ideas and inspiration that I don’t share anywhere else.
Welcome to the Ultimate Photo Tips list! Your subscription has been confirmed. I look forward to sharing tips, ideas, and inspiration with you that will help you to make those "wow" images we all strive for.
In this video, see how important it is to have a center of interest for your photograph. Learn photography through a friendly and constructive photography critique.
Have you ever wondered why it’s so important to have a centre of interest in your photographs? Hi, I’m Julie from Ultimate Photo Tips, and it’s critique week again! This week, I’m going to talk about a photo’s centre of interest using an image generously submitted by Caje Rodriguez from Ottawa, Canada. I hope I’m pronouncing that name correctly; if not I do apologize! A huge thank you to Caje for sending in his image.
As always, remember that these comments are just my opinion. I do hope I can offer up some food for thought that you might be able to apply to your own images. So, let’s get started.
Here we are in Lightroom with the image "Wolf Trail, Gatineau Park," which is a beautiful area near Ottawa, Canada where you can get some great Fall color, just like we have in this image.
So let me start by talking about what I really enjoy about this image, and that is the mood that’s created here. A lot of that has to do with the mist. I really love mist! The mist here really adds depth to the photo. We have these layers from most defined to least defined as we come into the mist. It really adds some depth, and a sense of mystery as well, as to what’s beyond. I also love the color here: the warmth of the Fall colors, and all the detail that we have here in the leaves and the branches. So that’s really nicely done, and definitely I can see what attracted the photographer to this scene.
I’m going to start by just quickly talking about the exposure. This was shot at 1/5s at f/16 and ISO 100, which is quite a reasonable choice. It’s obviously on a tripod with an exposure that long; nice and sharp! The ISO 100 is good to minimize the noise. I would personally prefer to see a little bit more exposure here, just a little bit brighter. Now that’s very subjective, because it definitely changes the mood. A little bit darker image is maybe a little more mystery; a bit darker image is a little bit "happier." I, since I’m feeling nice and happy, am going to bump up the exposure a bit to here. I’ll let your eyes adjust to that!
I think what I’m also going to do is add a little bit of midtone contrast just to bring a bit more definition to some of the trees in the mist and a bit more detail. Again, that’s a subjective choice.
Now, I want to talk about what I think is the main issue with this image, and that is center of interest, or lack of a center of interest. We have this big open space all around the main area of the image that seems to be lacking a place for my eyes to rest. My eye is kind of hunting around the image, looking for a place to settle.
There are two fairly strong elements to this image. We have this tree here in the bottom left corner. It’s got some bright yellow leaves that are quite well-defined against the dark background, and some very well-defined dark branches. Then on the other side, we have an even more significant tree. This one also stands out against the background and has a very interesting shape to it. I think either of those could have made a strong foreground, a strong subject and center of interest for the image — especially the tree on the right because it really does have the most impact and the most unique shape. By these two elements being pushed off to the side, they are almost a distraction because they are pulling us towards the edges of the image, which makes that middle part of the image seem even more empty. So, although it’s a lovely scene, it’s lacking that center of interest that will really hold us and keep us looking at the image.
Adding a Center of Interest
What I would love to see here is a little bit of recomposition to move that tree, or some other element, to a place of more significance in the image. So, I’m going to do a little magic in Photoshop, and just show you what I mean by taking that tree on the right, and moving it into the image to act as a center of interest. So I’m going to flip to that Photoshopped version now.
Just so you know, what I did to create that in Photoshop was that I selected the tree and copied it onto its own layer. Then on the main layer underneath, I did a content-aware fill of the selection of the tree to fill in the background. I then had to do a bit more cloning as well. Now, it’s not a perfect clone job, but I just wanted to show you how it worked Then I took my layers that had just the tree, and I dragged it over, and moved it further into the image. To me, this now has more of a center of interest; a place where we can come back to and look at.
I do find that the bits at the edges — the green of this tree over here, and the yellow tree on the left, still pull me a bit too much to the edge. What I think we can do here is just crop it a little bit. I’m going to crop to an 8×10 format, which I know that will bring in those edges a little bit. Then I’m going to move my tree over a bit closer to the thirds position. Here’s my new crop.
This to me has a little bit less distraction at the edges. The one bit that does bother me still is this yellow tree down in the corner, just because those bits are so bright. I would suggest trying to clone that out. I’m going to do a very quick clone job here. Very quick – so it won’t be perfect at all — just to show you how we can tone this down. Maybe this little guy too. A very quick job just to remove those as distractions.
I think we’re almost there. The last thing that I want to do now that I see this image… I want that tree, our center of interest, to have even more impact. I’m just going to increase the contrast a little bit more. That makes the dark trunk stand out even more against the misty background.
That’s a bit of a rough job, but I think now, the image does have a center of interest.
When you’re out there looking, even if the scene is very serene and very beautiful, you need something to anchor the image.
So, once again, a very big thank you to Caje for sending in his image, and to all of you for watching. That’s it for today! Make sure to visit me on ultimate-photo-tips.com and sign up for my newsletter while you’re there. That’s where I share ideas and inspiration that I don’t share anywhere else.
Ultimate Photo Tips is actively seeking well-written and insightful articles to share with our readers. We are looking for photography tips that would be of interest to photographers of all experience levels. Topics may include techniques, equipment, post-processing, creative photography project ideas, or anything else of general interest to photographers.
Following are our terms for article submission.
Article Submission Terms
We only accept original content that is not published anywhere else on the web.
Articles must be non-promotional in nature.
In exchange for your article, we will provide a byline, and an author box, including author biography and photo, and one link to your website.
The ideal article length is between 600 and 1000 words.
We encourage you to submit 3 to 6 images with your article. You must hold the rights to any images you include, and you must have secured valid model or property releases where appropriate.
We may perform minor editing on submitted articles, but never in such a way as to change the intent or meaning.
Note: We are grateful for all submissions, but please understand that we may not be able to use every one we receive. We publish only articles of the very best quality. If we don’t publish your article, but your chosen topic is of interest, we may provide feedback so that you can improve the article and resubmit it.
Please submit your request to send us an article through our contact form. Put “article submission” in the subject line and please describe the content idea for the article and where you plan to link to. Thank you.
Ultimate Photo Tips provides friendly education and encouragement for photo enthusiasts around the world, presented in a way that’s clear, organized, and easy to understand. We have hints and tips to hone your skills and boost your creativity, whether you’re looking for the answer to a specific question, or just want to explore and learn.
Photography Critique Video
Getting external feedback on your photos is a great way to improve your photography. I hope I can can help! Every month, I’ll be doing a critique of an image submitted by a reader of the Ultimate Photo Tips newsletter. I aim to choose images which I feel everyone can learn from through my comments. Watch this week’s video about having a center of interest in your photos, and see if you discover something you can apply to your own photos!
Check out our extensive photography ideas section for interviews and articles on creativity, as well as loads of creative photography projects by subject and technique.
New to photography? Looking for photography techniques that will take your pictures from snapshots to images worthy of hanging on your wall? In this site, I’ve tried to include all the information I wish I had known when I was just starting out, and the things I had to learn "the hard way!" If you’re feeling overwhelmed by all that there is to learn — stop! Take a deep breath, and relax. Just take it one step at a time. Practice each new thing you learn as often as you can, and soon it will become second nature. Then, when you’re ready for your next photo tips, drop by this site for another visit.
You may want to start by checking out Beginning Photography Tips. Here, you’ll find basic photography information that will give you a thorough understanding of exposure, aperture, shutter speed, composition and more; it has everything you need to learn how to take better pictures.
Experienced photographer? If you’re a professional photographer or serious hobbyist, you’ve already discovered that photography is a journey of life-long learning. Within these pages, I hope you’ll find some useful nuggets to add to your knowledge. If you’re looking to build skills in a particular area, you may be interested in topic-specific sections such as Portrait Photography Tips or Wedding Photography Tips.
Something for everyone. Check out the extensive Tips for Taking Digital Photography, including information about photo editing, sharpening, pixels, histograms, sensor dust, and much, much more!
Photography is my passion. If you’re visiting this site, then there’s a good chance that it’s one of yours too! Welcome, kindred spirit! 🙂 I hope you enjoy the photo tips on this site, and that they are helpful to you in improving your photography. Happy shooting!
Photography = Technical Skill + Creativity
(Ultimate Photo Tips is here to help with both)
Excellent photographs are a combination of technical skill and creativity, in equal measure. You must have the technical skills to create a well-exposed and well-composed image. However, it’s just as important that your photographs are creative, and contain that extra "wow factor" to make them stand out from the crowd.
With practice, everyone can learn the technical skill. It is in the creativity that you distinguish yourself as a photographer. Your unique voice is a combination of your past experiences, your personality, your imagination and your emotional state at the time you make an image.
The single most important component of a camera is the twelve inches behind it."
–Ansel Adams
As such, you will find two kinds of information on this site: the photography techniques you need to make competent, technically sound images; and hints and photo tips that will boost your creativity, get you thinking out of the box, and help you to choose subject matter that you are passionate about.
Learn to use your technical skills to reinforce the emotion and the vision you are trying to convey in your photography. Choose the tools and techniques that support what you want to say about the subject in the most effective way.
Thanks to Brenda from the London (Canada) Camera Club for the idea for this week’s topic. She suggested "stairs," and I think it’s a great idea! Stairs have symbolic potential as a subject, since they take us from one level to another, and lead us up or down. They are also wonderful subjects for finding repeating lines and shapes. They can be found everywhere, so start hunting for those perfect stairs for this month’s challenge. I look forward to seeing your entry!
Read the rules. One entry only each month per person, please!
Enter your super-amazing photos in our photo contests. The winning image will be featured on the Ultimate Photo Tips homepage for all of the following month.
Here are ten tips to improve your sunset photography that go BEYOND just using a tripod. If you’re not getting the results you want with your sunset photos, I can help!
Sunsets are a favorite subject among photographers! Are you getting the results you want when you shoot at sunset? Hi, I’m Julie from Ultimate Photo Tips, and today, I’m going to share 10 tips for taking better sunset photos.
Sunset photography tip #1:
Exposure. To get your exposure right, you want to expose for the sky. If you meter off the sun, everything else in the image will go too dark, and if you meter of the foreground, you’ll probably find that the sky is too bright. To make sure you have your exposure correct, trust your histogram, not your LCD. The LCD may look darker than it really is because you’re looking at the bright sun in the background.
Sunset photography tip #2:
Silhouettes. If you do expose for the sky, your foreground will likely go into silhouette. Here’s an example.
A silhouette can make a great subject. You want to look for distinctive shapes that are not too large or solid so that they don’t take over the image with a big black area.
By the way, if you don’t want your subject to be silhouetted, then you can use fill flash to add light just on the subject.
Sunset photography tip #3:
Foreground First. Get to your destination early, before the sun goes down, and scout for an interesting foreground that will make a good composition. The foreground can make or break your image. In this case, these chairs add interest to scene.
Size of the Sun. The focal length of the lens that you use will affect the size of the sun in the final image. To make the sun appear larger within the frame, use a longer lens.
In this image, the sun appears quite small. I’m using a wide angle lens, at a focal length of 24mm.
Graduated ND filter. If you are including both sky and foreground in your shot at sunset, there is often a large dynamic range of tones from light to dark, and your sensor simply can’t record them all. You end up with blocked up shadows or blown out highlights. A graduated neutral density filter can help.
Sunset photography tip #6:
Look behind you. This might sound like an odd tip, but often while we’re watching a magnificent sunset, we forget to turn around. At sunset, the light in the opposite direction to the sun can be beautiful too. You often get gorgeous, soft, pastel skies, so look behind you!
Sunset photography tip #7:
Stay after sunset. Don’t pack up as soon as the sun goes down. The warm, gentle light that happens for the half hour or so after sunset can produce beautiful photos. Sometimes you’ll even get some great color in the clouds just after the sun sets. Stick around until the light is truly gone!
And here’s a bonus tip for you! Make sure to pack a flashlight so you can see your way out after dark!
Sunset photography tip #8:
Reflections. Look for objects that are reflecting the colors of the sunset, such as buildings or bodies of water. Including them in the photo can add extra interest, and sometimes the reflected light is strong enough to make a subject all on its own.
Here’s an example of a wave taken at sunset. The sky is not part of the image, but the warm light of sunset is creating color and interest in the wave itself.
White Balance. You may want to use a white balance setting of shade or cloudy to boost the warm colors in the image, particularly if you are shooting in JPEG and won’t be post-processing your image.
Sunset photography tip #10:
Protect Your Eyes. Remember not to look directly at the sun while you’re photographing your sunsets. That includes not looking through your lens with the sun in the frame, since the lens can magnify the light of the sun, doing even more damage to your eyes. Try using live view to compose instead.
That’s it for today! Hope you found those ideas helpful. For more great photo tips, head on over to the ultimate-photo-tips.com website, and remember to sign up for my newsletter while you’re there. That’s where I share ideas and inspiration that I don’t share anywhere else.
Are you interested in learning a new Photoshop technique that will give a nice glow to your image? Nothing over the top, I promise!
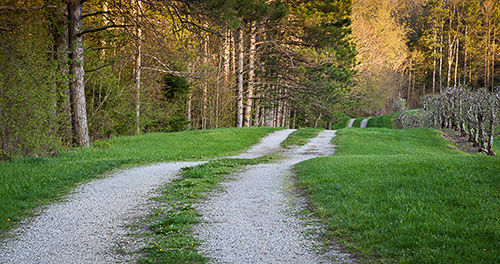
Hi, I’m Julie, from Ultimate Photo Tips, and having recently returned form New Brunswick Canada, and seen Canadian photographer Freeman Patterson, I am inspired to share with you a technique that I learned from him many years ago. It’s called the “Orton effect.” Now, in the old days (and I can’t believe I’m saying the “old days!”), the Orton was done with slide film. You would take two slides of the exact same subject: one that’s completely in focus, and one that’s a little bit out of focus, and you’d sandwich them together. The out of focus slide will give a bit of a glow to all the elements in your photo.
Today, that’s really easy to do digitally using Photoshop. That’s what I’m going to share with you today. Without further ado, let’s dive right in.
Alright, here I am in Photoshop with my image ready to go. This technique that I’m going to show you will work in Photoshop CSx or in Photoshop Elements. So, I’ve got my image with any of the basic adjustments that I want in contrast, etc., and it’s ready to apply my Orton technique.
Step 1. Duplicate the background layer. The first thing I’m going to do is duplicate the background layer. So that’s Command+J or Control+J, depending if you’re on a Mac or a PC. So, I’ve duplicated my layer. Now, I like to name my layers, so that if I go back into the file later I know what I was doing. So, I’m going to rename this layer “Orton,” because that’s the technique we’re applying.
Step 2. Blur the top layer. An Orton really involves creating a blurred layer, and then blending it in with the layer underneath. So the first thing I’m going to do is go under the Filters [menu] -> Blur -> Gaussian Blur. I’m going to blur this layer. Now, you can see from the preview that’s showing that I’ve only got a very small radius. It’s not much of a blur right now. For this technique, I actually want to create quite a lot of blur. I’m going to increase the radius quite a lot, somewhere into the 20’s. The number you pick is completely personal taste. It’s going to affect how much of a glow effect you get in the final image. You really need to experiment and decide what you like. I like something like this (~24) so I’m going to choose this and say “OK.”
Step 3. Switch to Soft Light blend mode. Obviously we don’t want our final image to look all blurry, so the next step we have to take is to blend this layer with the one below. So, instead of a normal blending mode, which means that this layer is opaque and that’s all you see, I’m going to choose a soft light blending mode.
What soft light does is that anything in the current layer that is 50% brightness or greater blends with the layer below to make it brighter; so bright things get brighter. Then, for 50% brightness or less, the darker things make the layer below get darker. But just in a soft and gentle way.
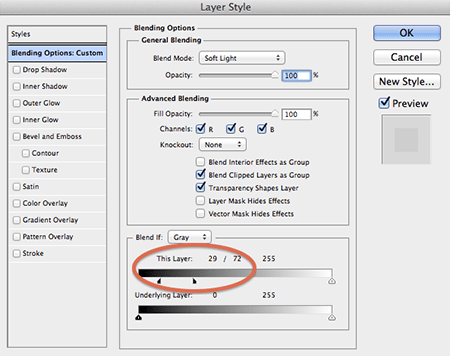
Step 4. Use the Blend-if slider. Alright, so I’ve almost finished. But there is still a bit of a problem with this, and that is that the dark parts of the image (here, here, across the top), have gone very dark, and completely blocked up the shadows. I don’t want that. To correct that, I’m going to go to my Orton layer and double-click it to open up the Layers Style dialog. What I’m going to play with is this “blend if” slider down here.
if I move this triangle on the black end up a little bit, watch in the image what happens to the dark areas when I move it back and forth a little bit. These are brightness values from dark to light. What’s happening is that everything to the left of this triangle — the very darkest areas — becomes transparent. So the top layer is no longer blended with the bottom layer in the darkest areas. That’s going to help us recover some of that shadow detail. I’m going to start it just at the point where it starts to have an effect.
Step 5. Split the triangle. Now the problem that we have is that we have some pixels in the top layer that are transparent, and some that aren’t, and a very hard transition between them, so there’s a noticeable edge. We don’t want that either. The next thing we’re going to do is we’re going to hold down the Alt key while we click on the little triangle, which splits it apart. Then we can drag the top part up a little bit.
After applying the Orton Effect
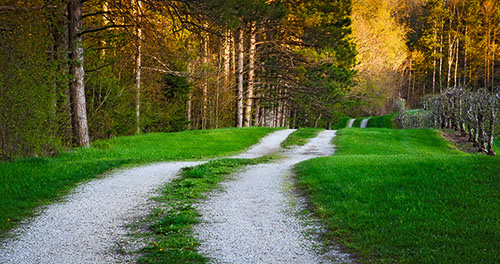
What that’s doing is that all the value to the left of the triangle are transparent. All the values in between where I’ve split it transition from transparent to opaque. And then everything to the right of this triangle is opaque. So the brightest things do blend through with the bottom layer. So, I’m going to say “OK” to that and you can now see our final image with the Orton effect applied.
Now, just to show you what that slider was doing, I’m going to turn off the background layer. You can see that in the darkest areas, this top layer is completely transparent, so only the bottom layer is showing through, and we’re not blending in anything from the top. And then there are some areas that are partially opaque. That’s where we’re blending through a little bit of the top layer. And then in some areas we’re blending the entire top layer (i.e., at 100%). Those areas are the brighter areas.
When I put my background back on, now you can see the final image. Now, just to show you the before and after, I’m going to turn on and off our Orton layer. So this is our “after,” and this is our “before.” You can see that when we put our Orton layer on, it really just makes the colors seem richer, and we get a quite warm-looking glow to the image. So that’s the Orton effect. It’s time for you to go and try it out on some of your images.
So I hope you enjoyed that, and you’re ready to try it out on some of your own images. For more fun photo tips, please stop by ultimate-photo-tips.com, and make sure to sign up for my newsletter while you’re there. That’s where I share ideas and inspiration that I don’t share anywhere else.