All photos and text © Julie Waterhouse, all rights reserved worldwide. No form of reproduction or usage (including copying in whole or in part, or altering of digital image and text files) is permitted without the express written permission of Julie Waterhouse.
Introduction
When you see a flower, your brain rushes to label it. “Flower!” it exclaims loudly and proudly. This voice that labels objects around us is essential in a world where we are constantly bombarded by visual stimuli. Without this labeling and categorizing mechanism, we would become overwhelmed with information. However, the brain’s labeling system works against the photographer. Once we identify and label an object, we often don’t look any further. When that happens, we miss out on really seeing. “Tree,” says our brain. And then the object is dismissed without noticing the graceful curve of the branch, or the way the wind is blowing through the leaves, or the silhouette that it forms against the skyline – all potential photographic opportunities.
When photographing subjects close up, images often become abstract, since you are seeing only a portion of the subject. This takes away your brain’s ability to easily label, and suddenly, you are able to really see. Your attention is now guided to the lines, shapes, textures, and patterns of the subject, which are the fundamental building blocks of all images. Learning to turn off labeling when you look at the world around you is a great gift for training the photographic eye. Close-up photography can help you to hone this skill, and I believe that practice at close-up shooting will improve the rest of your photography too.
Definitions
If we’re going to have a course on close-up photography, we’d better define it first! What is the difference between macro photography and close-up photography? Macro photography, in its strictest definition, means that the subject is projected onto the film or digital sensor at (at least) the same size as it is in real life, i.e., at a 1:1 ratio or greater. Most macro lenses do at least half this well, projecting images at half life size, or at 1:2. The best macro lenses manage true life size.
Nowadays, many consumer lenses on the market tout "macro capabilities." This typically means an ability for close-focusing so that the image is life-size on a 4"x6" print, rather than on the film or sensor. That amounts to a magnification of only about 1:4, which requires lower lens quality.
Close-up photography is simply a looser definition of macro photography where we don’t enforce the requirement for 1:1 magnification of the subject on the sensor. Instead, we refer to close-up photography as the act of photographing a subject in close range so that it fills the frame.
For this course, it’s not important that you have a true macro lens. What you do need is the ability for close focusing so that you can fill your picture frame with small objects. If you find that you enjoy this kind of photography, you will probably want to acquire a true macro lens eventually, because it provides the best image quality.
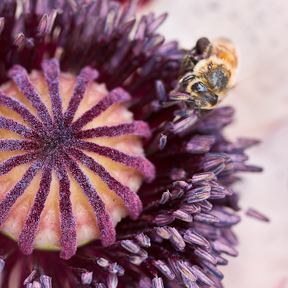
Bee on poppy
© Julie Waterhouse Photography
This photo would be considered "close-up," but not true macro, since the bee was not life size on the sensor (it’s probably about life size in this image). It was taken with a 100mm macro lens, but I was standing further back than the closest possible focusing distance.
Equipment
Let’s talk about the different kinds of equipment you can use to do close-up photography. There are a few options in terms of lenses, and a few must-have accessories.
Macro lens:
A macro lens allows focus from very close to the subject. A true macro lens magnifies the subject so that the ratio of its actual size to its size on film is 1:1 or greater. Macro lenses are typically found in three different focal length ranges. Lenses in the range of 50mm-60mm are usually used for product photography and photographing small objects. The classic macro lens for photographing insects, flowers and small objects is in the range of 90mm-105mm. Finally, you can get macro lenses in the range of 150mm to 200mm, which are useful for photographing insects and small animals because they give you more working distance from your subject.
Tripod:
A tripod is used to stabilise the camera, and prevent movement due to hand shake. A tripod is essential for close-up photography. Because you are looking at such a small area of the subject, even tiny movement of the camera has a huge impact on the composition. Also, over a long exposure, any shaking of the camera will cause blur in the image.
Cable or remote shutter release:
A remote shutter release reduces the camera shake caused by your finger depressing the shutter button. Use it in conjunction with your tripod.
Mirror lockup:
Mirror lockup is a camera feature used to reduce camera shake due to the vibration of the mirror. In this mode, the first release of the shutter button raises the mirror, and the second takes the picture. Grab your camera manual now, and figure out how to turn on mirror lockup. You should use it while shooting close up.
Extension tubes:
Extension tubes are attachments that contain no optical elements (i.e., no glass), but are used with a lens to allow closer focusing of that lens. Extension tubes are attached between your camera and your lens. They work by moving your lens further from the subject, which allows it to focus closer. Usually, they come in sets of three. The tubes can be used individually, or stacked together.
Close-up filter
A close-up lens, or close-up filter, screws onto the end of a regular lens, and gives it the ability to focus much closer to the subject. Quality varies greatly. There are some excellent quality two-element close-up lenses, but the majority are inexpensive single-element close-up lenses that produce images that lack sharpness. These are most often used on cameras with fixed lenses.
Teleconverter (multiplier):
Attached to the camera along with a lens, a teleconverter multiplies the focal length of the lens, usually by 1.4x or 2x. Your working distance from the subject remains the same, but the image is magnified. When using a teleconverter, you will typically lose a stop of light (i.e., you will require a longer shutter speed for the same exposure).
Lensbaby™ with macro attachment:
A Lensbaby is a specialty lens that has one ‘sweet spot’ of focus, surrounded by graduated blur. The point of focus and the amount of blur can be controlled by actually bending the lens. Lensbaby macro attachments of 4x and 10x magnification can be screwed onto the front. If you haven’t heard about this great toy before, check out http://lensbaby.com for more information. Lots of fun!
Lighting
Lighting is a special challenge for close-up photography. Using some of the equipment above, you can find yourself with your subject almost touching your lens. In that situation, it’s impossible to get a light between the camera and the subject.
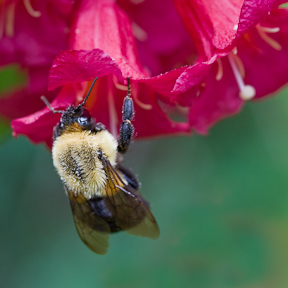
© Julie Waterhouse Photography
I have always preferred the look of natural light, so I do the vast majority of my close-up photography outdoors or using a bright window light. I use a tripod, and must sometimes shoot with long shutter speeds if the light is not at full strength. Because my usual subject matter is still, I don’t need to be concerned about the long shutter speeds.
In this case, I had to abandon my tripod to chase this little fellow around. I photographed him at 1/125s, and had to open the aperture up to f/4.5 to let in enough light. Even then, I increased my ISO to 320 to get a correct exposure.
This was taken with a 100mm macro, so I wasn’t right on top of the subject.
Another way to deal with the lighting is to use a longer macro lens (in the 100mm to 200mm range) that allows you greater working distance. This way, you are able to fit a light between camera and subject.
Finally, a ring flash with flash tubes in a circle around the lens can provide a workable lighting solution. Today, continuous LED ring lights are also available to light the subject.
Hints and Tips
Working Distance
In close-up photography, you have only a small working distance between the camera and the subject. Shooting with your camera close to your subject provides special challenges. Any movement of either camera or subject is greatly magnified. A tripod, remote shutter release, and mirror lockup can reduce movement due to camera shake.
Technique 1: You must take care when composing your image to make small and precise adjustments as you refine your composition; a movement of your camera by as little as half an inch will drastically change the composition when the subject is only inches from the lens.
Technique 2: For mirror lockup to be effective, you must use it in conjunction with a remote shutter release. It’s no good eliminating the vibration of the mirror coming up, if you’re still going to be pressing down on the shutter with big, clumsy fingers! The first press of your remote cable release will raise the mirror. After that, WAIT a few seconds for the vibrations caused by the mirror lifting to cease. Only then should you press the remote release a second time to take the shot. Too often, I watch people make two quick presses in succession. What’s the point? If you’re going to do that, you may as well not bother with mirror lockup in the first place!
Working with Mother Nature
Other difficulties arise when your subject is moving. Here’s where you need to get creative. A little sugar water might be enough to stop an ant in its tracks. Photographing insects very early in the morning, while their wings are still covered in dew, and they can’t fly away, can be helpful.
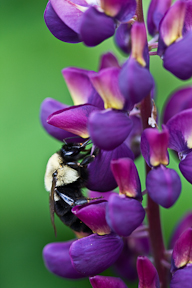
Bee on lupine
© Julie Waterhouse Photography
Remember, when you are photographing live subjects in Nature, you must make sure not to stress your subject by getting too close, or interfering with it in a negative way. If you remove any debris around your subject to eliminate distractions, always put it back afterwards. Some plants rely on the cover. Be gentle with flowers, and don’t break off any buds. Flowers need to bloom and produce seeds in order to survive. Take string or velcro ties into the field to hold back stray weeds or branches, instead of breaking them off.
The bottom line? Always be respectful, and take care of Nature.
Connecting Emotionally
Photography is a marriage of technical skill and creativity. Both are essential ingredients in making successful images. In this course, we will spend a lot of time on the technical side of things, but right now, I want to spent a moment on the creative side.
For me, the beginning of any good image lies in determining what has attracted me to my chosen subject matter. Why have I chosen it? When we are doing our creative photography, we are usually drawn to our subject by some kind of emotional pull. Most often, this is instinctive, and the reason for the draw may never reach our conscious minds. I’d like to encourage you to change that. Before shooting a subject, I’d like you to try to analyse why you are drawn to it. I believe this analysis is the first step in improving your images.
"The single most important component of a camera is the twelve inches behind it."
–Ansel Adams
Once you understand what has attracted you to a particular subject, you are then able to select the right tools from your technical toolkit to strengthen your message. This course will provide you with new tools for your close-up toolkit. It will also try to teach you when and why to use each one so that you can communicate your creative choices most effectively.
Assignment #1:
Please use this assignment as an opportunity to acquaint (or reacquaint) yourself with all your
equipment. Take the time to set up your gear, learn how to use mirror lockup, and take a few images.
In this assignment, you will exercise that magical 12 inches behind the camera, where your emotions
live!
1. Make 3 close-up images where you feel a strong emotional connection to the subject.
Briefly describe in words:
a) what emotion you felt as you made the image (e.g., joy? sadness? awe? something else?)
b) what it was about the subject that attracted your attention? (e.g., the colour? the curve of a petal?
the empty space around the subject? something else?)
It’s very helpful to become consciously aware of your reactions to your subject matter, and the
decisions you usually make instinctively and subconsciously.
Happy shooting!
All photos and text © Julie Waterhouse, all rights reserved worldwide. No form of reproduction or usage (including copying in whole or in part, or altering of digital image and text files) is permitted without the express written permission of Julie Waterhouse