Photography Critique #4:Center of Interest
Photography Critique #4:
Center of Interest
In this video, see how important it is to have a center of interest for your photograph. Learn photography through a friendly and constructive photography critique.

Spread the joy! Share today’s tweetable!
Video Transcript
Have you ever wondered why it’s so important to have a centre of interest in your photographs? Hi, I’m Julie from Ultimate Photo Tips, and it’s critique week again! This week, I’m going to talk about a photo’s centre of interest using an image generously submitted by Caje Rodriguez from Ottawa, Canada. I hope I’m pronouncing that name correctly; if not I do apologize! A huge thank you to Caje for sending in his image.
As always, remember that these comments are just my opinion. I do hope I can offer up some food for thought that you might be able to apply to your own images. So, let’s get started.
Here we are in Lightroom with the image "Wolf Trail, Gatineau Park," which is a beautiful area near Ottawa, Canada where you can get some great Fall color, just like we have in this image.
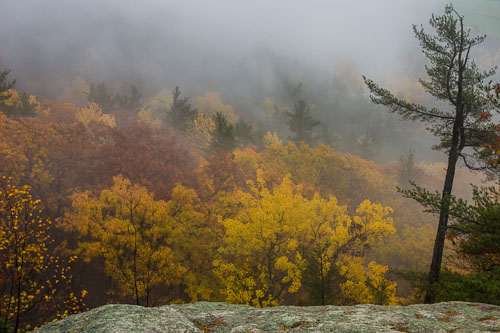
© Caje Rodriguez
So let me start by talking about what I really enjoy about this image, and that is the mood that’s created here. A lot of that has to do with the mist. I really love mist! The mist here really adds depth to the photo. We have these layers from most defined to least defined as we come into the mist. It really adds some depth, and a sense of mystery as well, as to what’s beyond. I also love the color here: the warmth of the Fall colors, and all the detail that we have here in the leaves and the branches. So that’s really nicely done, and definitely I can see what attracted the photographer to this scene.
I’m going to start by just quickly talking about the exposure. This was shot at 1/5s at f/16 and ISO 100, which is quite a reasonable choice. It’s obviously on a tripod with an exposure that long; nice and sharp! The ISO 100 is good to minimize the noise. I would personally prefer to see a little bit more exposure here, just a little bit brighter. Now that’s very subjective, because it definitely changes the mood. A little bit darker image is maybe a little more mystery; a bit darker image is a little bit "happier." I, since I’m feeling nice and happy, am going to bump up the exposure a bit to here. I’ll let your eyes adjust to that!
I think what I’m also going to do is add a little bit of midtone contrast just to bring a bit more definition to some of the trees in the mist and a bit more detail. Again, that’s a subjective choice.
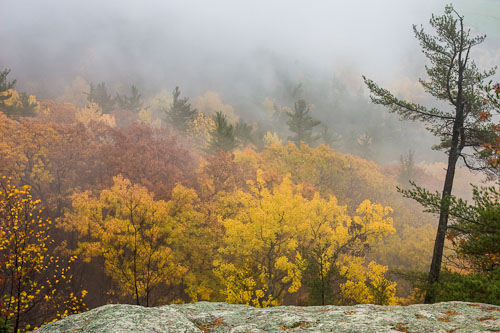
© Caje Rodriguez
(Edits by Julie)
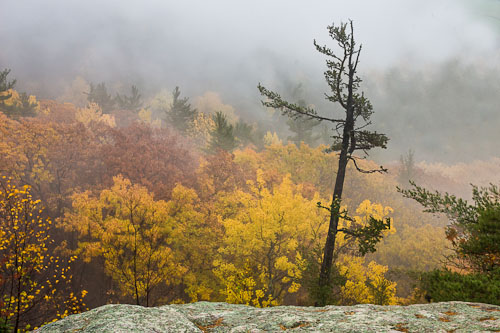
Now, I want to talk about what I think is the main issue with this image, and that is center of interest, or lack of a center of interest. We have this big open space all around the main area of the image that seems to be lacking a place for my eyes to rest. My eye is kind of hunting around the image, looking for a place to settle.
There are two fairly strong elements to this image. We have this tree here in the bottom left corner. It’s got some bright yellow leaves that are quite well-defined against the dark background, and some very well-defined dark branches. Then on the other side, we have an even more significant tree. This one also stands out against the background and has a very interesting shape to it. I think either of those could have made a strong foreground, a strong subject and center of interest for the image — especially the tree on the right because it really does have the most impact and the most unique shape. By these two elements being pushed off to the side, they are almost a distraction because they are pulling us towards the edges of the image, which makes that middle part of the image seem even more empty. So, although it’s a lovely scene, it’s lacking that center of interest that will really hold us and keep us looking at the image.
Adding a Center of Interest
What I would love to see here is a little bit of recomposition to move that tree, or some other element, to a place of more significance in the image. So, I’m going to do a little magic in Photoshop, and just show you what I mean by taking that tree on the right, and moving it into the image to act as a center of interest. So I’m going to flip to that Photoshopped version now.
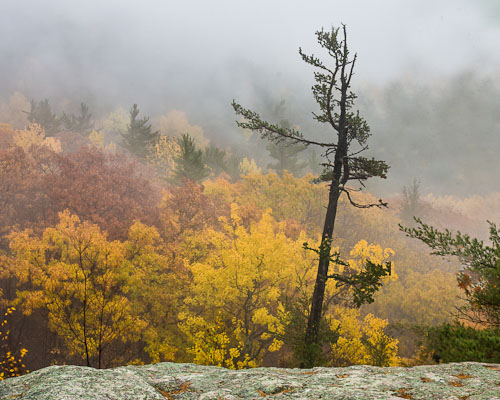
© Caje Rodriguez
(Edits by Julie)
Just so you know, what I did to create that in Photoshop was that I selected the tree and copied it onto its own layer. Then on the main layer underneath, I did a content-aware fill of the selection of the tree to fill in the background. I then had to do a bit more cloning as well. Now, it’s not a perfect clone job, but I just wanted to show you how it worked Then I took my layers that had just the tree, and I dragged it over, and moved it further into the image. To me, this now has more of a center of interest; a place where we can come back to and look at.
I do find that the bits at the edges — the green of this tree over here, and the yellow tree on the left, still pull me a bit too much to the edge. What I think we can do here is just crop it a little bit. I’m going to crop to an 8×10 format, which I know that will bring in those edges a little bit. Then I’m going to move my tree over a bit closer to the thirds position. Here’s my new crop.
© Caje Rodriguez
(Edits by Julie)
This to me has a little bit less distraction at the edges. The one bit that does bother me still is this yellow tree down in the corner, just because those bits are so bright. I would suggest trying to clone that out. I’m going to do a very quick clone job here. Very quick – so it won’t be perfect at all — just to show you how we can tone this down. Maybe this little guy too. A very quick job just to remove those as distractions.
I think we’re almost there. The last thing that I want to do now that I see this image… I want that tree, our center of interest, to have even more impact. I’m just going to increase the contrast a little bit more. That makes the dark trunk stand out even more against the misty background.

© Caje Rodriguez
(Edits by Julie)
That’s a bit of a rough job, but I think now, the image does have a center of interest.
When you’re out there looking, even if the scene is very serene and very beautiful, you need something to anchor the image.
So, once again, a very big thank you to Caje for sending in his image, and to all of you for watching. That’s it for today! Make sure to visit me on ultimate-photo-tips.com and sign up for my newsletter while you’re there. That’s where I share ideas and inspiration that I don’t share anywhere else.
Happy shooting, and I’ll see you next time!
I hope you enjoyed this photography critique! Be sure to check out more beginner photography critique videos, as well as our Two Minute Photo tips videos on digital photography technique.
Return to Beginner Photography (Photography Critique Index)