All photos and text © Julie Waterhouse, all rights reserved worldwide. No form of reproduction or usage (including copying in whole or in part, or altering of digital image and text files) is permitted without the express written permission of Julie Waterhouse.
Distractions
The human brain is an amazing instrument. It has many ways of helping us handle the huge volume of information we encounter every second. One of the mechanisms it uses is filtering. Through the process of paying attention, we filter out unnecessary information. When we pay attention to something, it means we ignore everything else around.
You may have heard about the psychological study that was conducted in which subjects were asked to watch a clip of a basketball game. They were asked to pay attention to the players passing the ball, and count how many passes were made. The clip lasts a few minutes. About thirty seconds into the clip, a person dressed in a gorilla suit walks onto the court and does a jig. Approximately half the subjects failed to notice the person in the gorilla suit. Their attention was directed elsewhere.
As photographers, we often fall victim to this same phenomenon. For example, when we are taking a picture of our friend, our attention is focused on her. We fail to notice that there’s a lamp post "growing" out from behind her head, and that someone else’s elbow is intruding into the picture space.
Before you release the shutter, do a quick scan around the entire image to look for distractions. Sometimes, you can become so focused on the subject itself that you literally don’t see anything else in the frame. You must train yourself to look for these distractions. Pay attention to everything in the frame!
There are several kinds of distractions that can spoil your image:
Intrusions
It’s especially important to scan the edges of the frame to look for objects that intrude into the picture space. Objects at the edge of the frame carry extra “visual weight” (i.e., our brain affords them more importance).
 © Julie Waterhouse Photography |
 © Julie Waterhouse Photography |
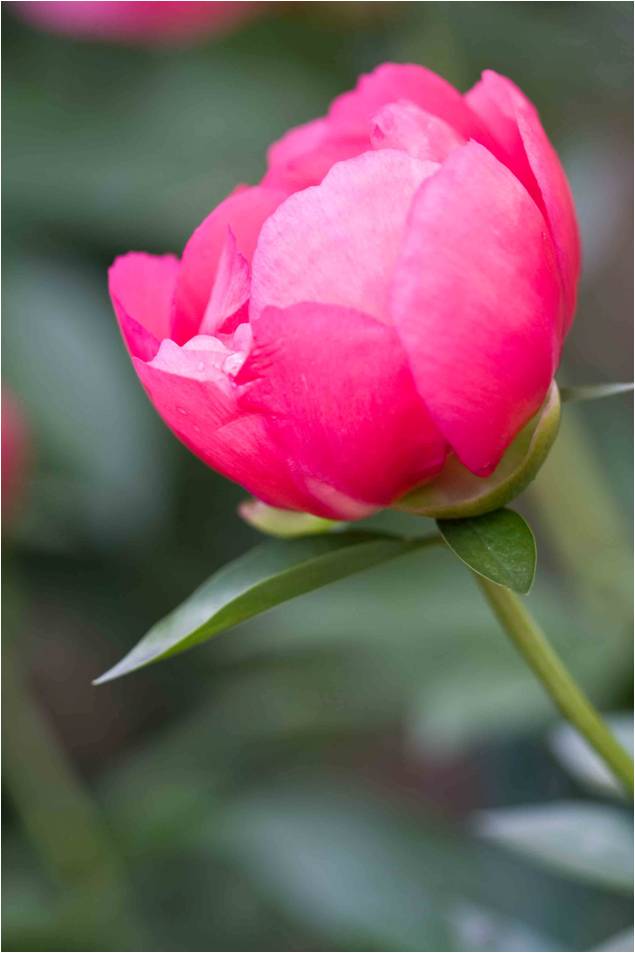
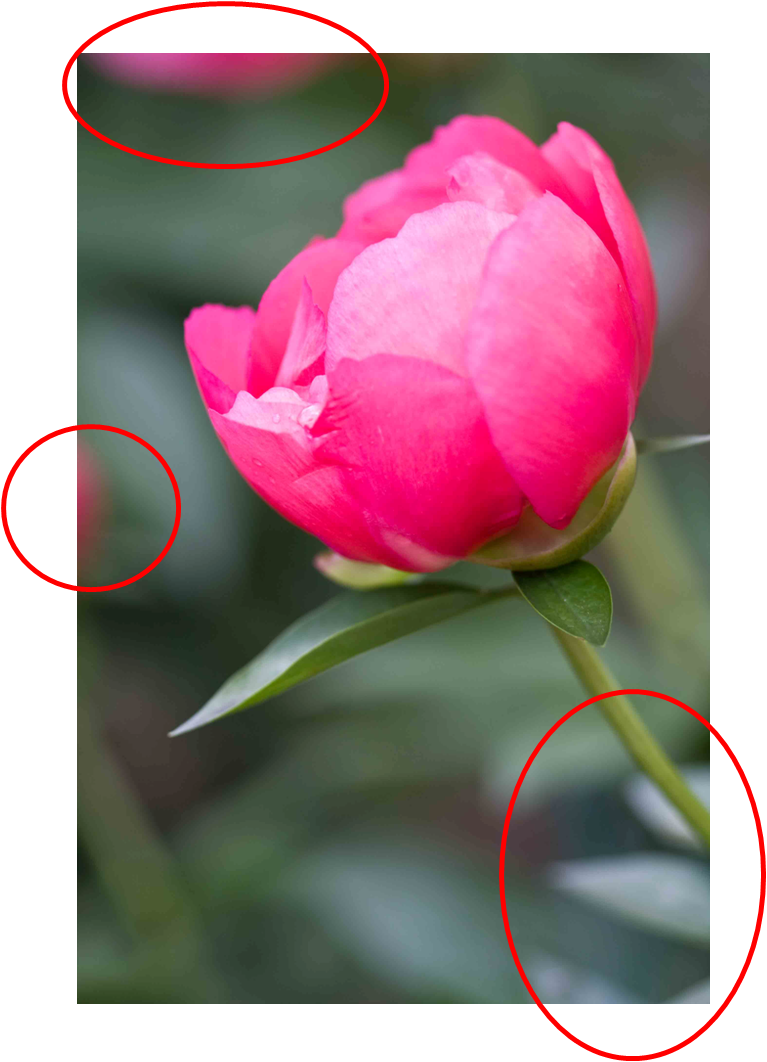
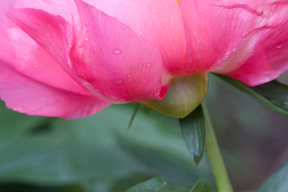
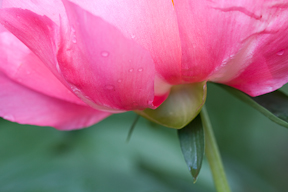
In the above image, I find the bits of pink flower on the top and at the left to be distracting. This is because their colour contrasts strongly with the surrounding green, and they are right at the edge of the frame.
In addition, I find the bright leaves in the bottom right a bit distracting too. See the next section for a discussion about "hot spots."
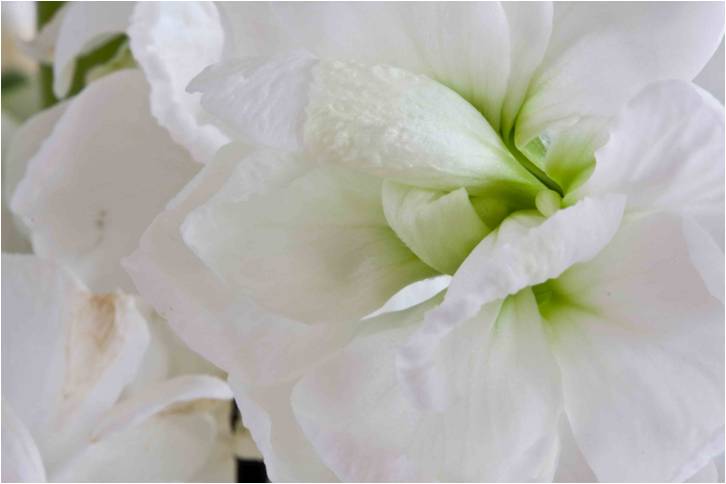
 © Julie Waterhouse Photography |
 © Julie Waterhouse Photography |
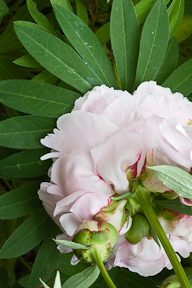
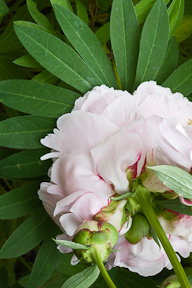
Do you see the main distraction in the image on the left? I confess that I did not notice it in the field, so I resorted to cloning it out in Photoshop after the fact. It’s so much easier to get rid of these things before shooting! That’s why you must look carefully around the frame after composing.
In case you didn’t spot it, the distraction is the two white petals intruding from the bottom left. If you look carefully, you’ll see that I took the liberty of cloning out a few little white spots on the leaves as well. I often clean up little spots of dirt using Photoshop.
Hot Spots and "Black Holes"
Very light or very dark objects (light or dark in relation to their surroundings) draw our eyes. If you want to draw attention to a light colored subject, place it against a dark background. Conversely, place a dark subject against a light background to make it stand out.
"Hot spots" and "black holes" happen when we unintentionally draw attention to a part of the image other than our main subject because it is very bright or very dark. Hot spots tend to be the result of a light source reflecting off something in the picture. Black holes, or very dark spots, tend to be the result of an area that has fallen into deep shadow, or an area where a dark background is showing through. Both kinds of artefact carry strong visual weight, and will take attention away from your main subject.
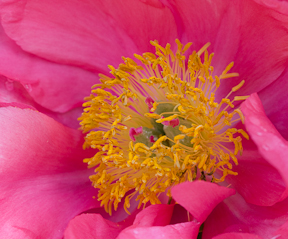
Your eye is always drawn to the
brightest spot in an image.
© Julie Waterhouse Photography
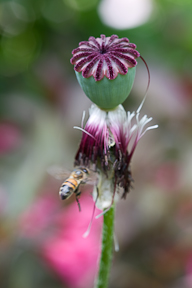
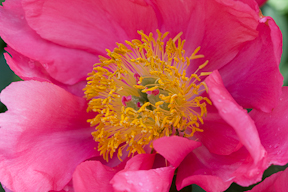
The large, white spot at the top of the image is highly distracting. Your eye is always drawn to the brightest part of an image. You can’t help but keep looking back at that white! It is probably a reflection off another flower in the background.
In general, to eliminate bright spots, try to recompose, move the subject out of the bright light, or use a diffuser. Lesson 8 will discuss diffusers in great detail.
Note that in this case, the pink flower in the background is also a distraction because of its strong colour. If the image were converted to black and white, that distraction would be eliminated, however the white spot would still pull your eye.
Your eye is also pulled into black holes.
© Julie Waterhouse Photography
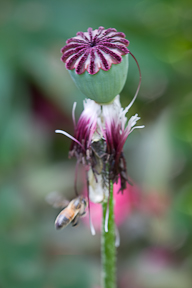
In this case, I moved my camera around to the right slightly to eliminate the bright, white spot. Unfortunately, I introduced what I refer to as a "black hole" in the process! Do you see the very dark area just to the left of the petal remnants? Now that the bright spot is gone, this dark one pulls your eye. Sometimes you can’t win!
It’s challenging to do this recomposition ‘on the fly,’ while chasing a honey bee! If I hadn’t wanted to include him in the frame, I would have set up my tripod and taken my time framing the flower against a neutral background (without that pink flower behind!). In cases like this, you have to spot distractions, and react to correct them quickly.
This was a difficult subject, and I didn’t end up making any satisfactory images of it. I didn’t have access to an angle with a clean and simple background. Time to move on to something else!
In general, to eliminate dark spots, try to recompose, move the subject, hold some material behind the subject to fill in a gap, or use a reflector to bounce light into the dark area. Lesson 5 will discuss reflectors in great detail.
© Julie Waterhouse Photography
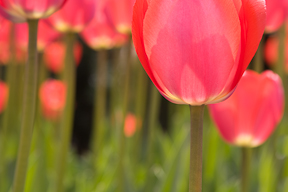
Here’s another example of a black hole. There’s a gap between the tulip stems, and whatever is behind them is very dark. Since the background is too large and too far away to control directly, the best solution is simply to recompose. Moving the camera to the left or right might create an angle where the tulip stems fill in the dark hole.
Technique 1: A trick to drawing your attention to these trouble spots before you take the picture is to defocus the lens slightly. This stops you from seeing the actual picture elements, and reduces everything to fields of tone and color. Any excessively light or dark spots will now jump out at you. Another way to do this trick is just to squint your eyes. This effectively "defocuses" them and achieves the same effect.
Mergers
When two objects overlap one another, we refer to it as a merger. If the overlap is slight, it can actually be distracting. Try to adjust your camera angle to separate all the objects in the frame.
 © Julie Waterhouse Photography |
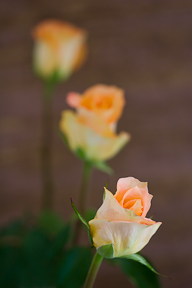 © Julie Waterhouse Photography |
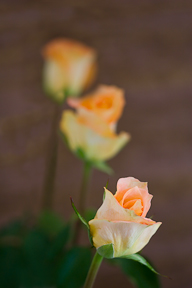
In the image on the left, the top rose "merges" with the rose below it. In other words, the two flowers overlap. In the image on the right, this has been corrected by moving the top rose up to allow space between the flowers. This separation is more pleasing to the eye.
Places where the subject touches the frame are also known as “mergers,” and draw your attention as well.
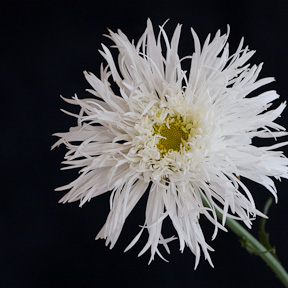
Merger with the frame.
© Julie Waterhouse Photography
In the image on the left, the right hand edge of the daisy is just touching the frame. Because it’s not quite "in" and not quite "out" of the picture, this merger looks accidental, and the composition looks sloppy. The point where the flower touches the frame becomes a point of tension in the image and continually draws your eye.
The merger has been solved in the pair of images below. In the left-hand image, the daisy is moved fully into the frame. Equal space is given on all sides, making a balanced and deliberate composition. In the right-hand image, the problem merger has been eliminated by cropping the flower decisively to make the framing choice look intentional.
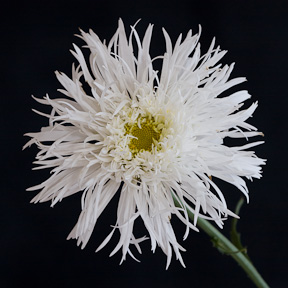 Solve the merger by moving the flower fully into the frame. © Julie Waterhouse Photography |
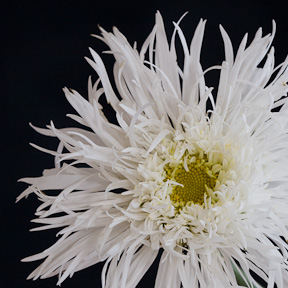 Solve the merger by decisively cropping the flower. © Julie Waterhouse Photography |
Backgrounds
Background Colour
Different coloured backgrounds can produce very different moods in your images. Black is usually dramatic. White is softer. Be careful with white, because it can take on colour casts, and will often take on a blue cast when in shadow. Background colours that are harmonious with the subject can create a more ‘quiet’ image, whereas background colours that contrast the subject can make the subject ‘pop.’ For flowers, green can produce a more natural look that doesn’t look like a studio shot (even if it is!). Experiment with different colours, and choose the one that reinforces the story that you want to tell.
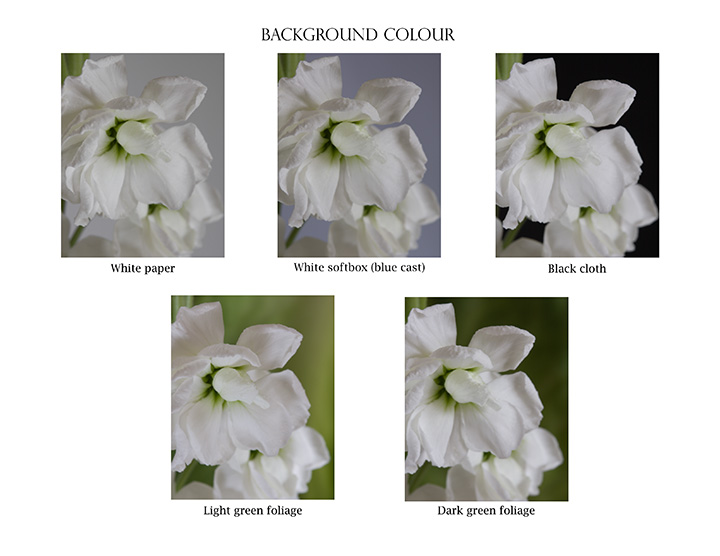
© Julie Waterhouse Photography
Busy Backgrounds
As I’ve already noted, it’s very easy for us to become so focused on our main subject that we don’t see anything else in the picture. Watch out for backgrounds that have a lot going on. Busy backgrounds can call attention away from your main subject.
To correct a busy background, you can recompose by changing your position, or move the subject relative to the camera so that you have a neutral wall, table, sky, grass, or any other uniformly coloured or textured object.
The leaves in the background are distracting.
© Julie Waterhouse Photography
A cleaner background.
© Julie Waterhouse Photography
In this case, changing the camera angle slightly, and moving a little closer to the subject to crop out the distractions at the bottom of the frame, helped to clean up the distracting elements in this background. A small adjustment can make a big difference.
It’s always best to get as close to the final image as you can in the field, and not to rely on post processing to “save” your image. However, you can always crop your image afterwards to eliminate distracting elements.
The dark background that shows around
the edges is distracting.
© Julie Waterhouse Photography
The distracting background is eliminated by cropping.
© Julie Waterhouse Photography
You can also place something behind your subject: drape a towel, sheet, or blanket.
A lettuce leaf was used to create a
simple, green background.
© Julie Waterhouse Photography
I sometimes hold another flower or leaf behind my subject and then shoot it at a shallow depth of field. If the leaf or flower is positioned sufficiently far behind the main subject, it stays out of focus, and provides a nice wash of colour in the background.
The background in this image is nice and clean. The green colour looks quite natural, like it may have been leaves of the same plant. In fact, it was winter-time, and I had no green foliage around at all. I got creative, and raided my refrigerator. What you see here is a lettuce leaf. If it’s held far enough behind the subject with a shallow depth of field, who’s to know?
You’re only limited by your imagination!
In Lesson 2, you learned about depth of field. A shallow depth of field is a fabulous tool for simplifying backgrounds. A wide aperture can often blur background details to eliminate distractions.
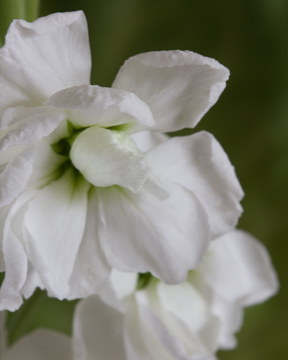
Large depth of field results in a
distracting background.
© Julie Waterhouse Photography
This image of a white stock flower has a very distracting background on the left. I photographed it with an aperture of f/22, producing a large depth of field. The other stock flowers further away and behind are also in focus, causing the distraction.
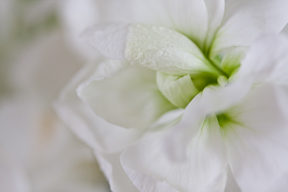
Shallow depth of field minimises distractions
in the background.
© Julie Waterhouse Photography
I made a second exposure of the exact same composition, changing only the aperture setting. This time, I shot the image "wide open" at f/2.8. Here, all the background clutter has been blurred, and it is no longer distracting. Even the very dark spot at the bottom has disappeared. Magic!
Assignment #4:
1. Distractions. Make 3 close-up images where you work hard to keep them simple, and free from distractions such as busy backgrounds, black holes and hot spots, mergers, and intrusions. The three images can be of different subjects if you want.
2. Background Colour. Make a pair of close-up images where you keep the same camera settings and composition, but switch out the background for one of a different colour.
a. Briefly tell me in words which image of the pair you like better, and why.
Upload all three (3) images for question #1, and the two (2) images for question #2, using the instructions you received in your welcome email. Include the text to answer question #2a in the "message" section when you upload the images. You will upload five (5) images in total. Remember to name your image files in such a way that it’s clear which question they address.
Happy shooting!
All photos and text © Julie Waterhouse, all rights reserved worldwide. No form of reproduction or usage (including copying in whole or in part, or altering of digital image and text files) is permitted without the express written permission of Julie Waterhouse.